
Introduction
The placing on the market of the Raspberry Pi (2012) marked a major change in the technological world.
For the first time, single board computers with small size and low cost were available to people. In this regard many articles extolled the potential of this card, and aroused the interest not only of the makers but also of passionate and curious people in the tech world. From 2012 to now many vendors are investing in this area, and place on the market different boards (Banana Pi, Pi Orange, Odroid, Pine A64, Lattepanda …) some of which have more performing hardware features in relation to a specific type of use .
As with anything new, many people bought the Raspberry Pi thinking it can be used for home automation applications (media center, home servers, reverse gaming, video surveillance, LED control, or electronic equipment, etc …) more or less complex. Unfortunately not everyone has in-depth knowledge of operating systems, programming languages, electronics and, for these people, the web (forums or tutorial) does not always offer “appropriate solutions.” Not all are familiar with the terminal and, also following a step by step guide, you may run into problems of various kinds.
The “no knowledge” of what you are doing or typing may result in not knowing how to solve problems you may encounter during installation or configuration of a system. This can be de-motivating for you, getting most of the time the abandonment of the project. Fortunately, there are solutions which can also be configured via a graphical interface and appear to be less “traumatic” to manage.
Targets
This article aims to provide a guide to installing a NAS server on a home LAN using a Banana Pro board
The guide will be divided into two parts:
PART 1
- What is a NAS server
- What is a Banana Pro, and why you chose this tab
- Materials
- Assembling the BananaPro kit
- Transfer Operating System into the MicroSD
- Initial configuration of the operating system
- Access OpenMediaVault via web interface
PART 3: Configuration of OpenMediaVault as NAS server
- Modify the admin password
- Configuration of a static ip
- Initial mounting of a Hard Disk
- SAMBA Server Configuration (users, share folders, permission)
- Transfer speed Test on a Gigabit LAN
PART 4: Client Configuration
- Client configuration on Windows
- Client configuration on Linux
- Client configuration on Android
Server NAS
A NAS Server (Network Attached Storage) can be considered as a PC connected to a file-sharing network. From this definition you can well understand that, as minimum requirements, the PC must have at least one network adapter (preferably Ethernet) and one or more Hard Disk, quite roomy, connected to it.
The usefulness of having this service in a home can be to have a centralized system where you can share files with all of the devices (smart phones, smart TV, tablet, PC …).
With such a system, you can have your own directory where back up photos or videos from your smartphone, see the same videos on a smart TV or a space in which to share your private files. Several NAS servers are available on the market and many articles have been published on the web. These Articles give you solutions adapted to each type of need (from a simple home server to server ideal for a large company).
The solution described in this article will be to have a NAS server similar to those available on the market but at a lower cost. The convenience of this solution will have the pros and cons of its use, which will be analyzed later.
Banana Pi and Banana Pro
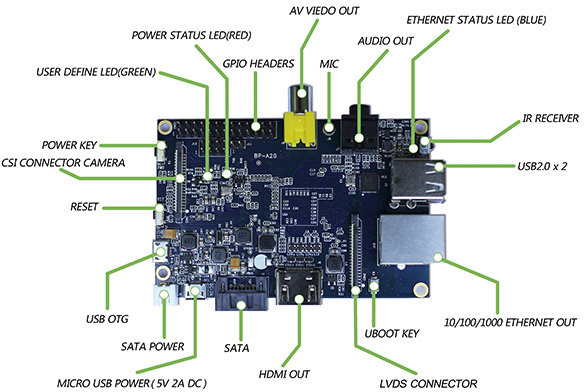
The Banana Pi and Banana Pro are boards similar to Raspberry Pi, but they have some hardware enhancements, particularly the Gigabit Ethernet network, as well as the introduction of SATA output (2.0) useful for storage. The main difference between the model and Banana Banana Pi Pro is the introduction of WiFi module in the last board. The Banana Pro was one of the first boards to have integrated WiFi module.
The decision to use this board instead of a Raspberry Pi is to have an output SATA (2.0) that ensures better performance than a USB 2.0 outputs for storage drives . The network card of the Banana Pi / Pro is much faster (1000 Mb / s) than that of the Raspberry Pi (100 Mb / s). It must be said that the performance of the Banana Pi network adapter is highlighted especially if the Banana Pi is connected a LAN Gigabit Ethernet (1000 Mb / s).
So it is vital that you check if your internal network supports this bandwidth speeds. You can do that going to check the specifications of the apparatus where you are going to connect the Banana Pi / Pro (the modem/router port switch). In case you have a FastEthernet switch port (100 Mb / s) the overall speed of the data transfer will be compared to that band.

For more information on comparing and Banana Raspberry Pi Pi in terms of performance you can see this article.
Compared to a NAS server available on the market, if you choose this system you will have the following advantages and disadvantages:
PRO of a NAS server with Banana Pi/Pro
- Lower cost of kit with respect to a commercial NAS server
- Low power consumption
- Simple configuration via web interface
- Ability to customize the server
CONS of a NAS server with Banana Pi/Pro
- Ability to add a single hard drive via SATA port
- Manual data backup
Materials
The solution recommended by me is this:

- Banana Pro kit (This kit provides a microSD 4Gb. Council to buy separately an 8 Gb microSD)
- microSD 8Gb class 10
- Ethernet cable cat 5e o higher ( the one inside the packaging of the modem / router is fine)
- Inner HD 2.5″ 1.5 TB
Per chi volesse utilizzare il BananaPi come scheda (no scheda wifi integrata)
- Banana Pi board
- microSD 8Gb class 10
- Power supply microUSB for Banana Pi
- Ethernet cable cat 5e o higher ( the one inside the packaging of the modem / router is fine)
- Inner HD 2.5″ 1.5 TB
- SATA wire for BananaPi
- Case for Banana Pi/Pro (or if you have a 3D printer, visit this link)

For those wishing to build their own gigabit Ethernet LAN network:
- Switch Gigabit Ethernet 5 ports or 8-port (depends on how many devices you’ll want to be connected with cable)
- Ethernet cable cat 5e o higher ( the one inside the packaging of the modem / router is fine)
For the physical configuration of the network:
- connect the switch with an ethernet cable, router
- connect the Banana Pi / Pro on an available port
- connect the other devices in the remaining ports (check if the other devices connected have gigabit ethernet network cards)
If you wanted to buy the Banana Pro to configure a NAS server via Wifi network I do not recommend this procedure because of the bandwidth speed on data transfer and because of the lack of wifi connection stability compared to an Ethernet connection.[:]