Introduction
I always wanted to be able to control my electronics and multimedia with a simple and flexible system that could be easily installed and configured. After working with both PICs and Arduino, I have found the ultimate solution: the Raspberry Pi. Along with PICs and Arduino, Raspberry Pi has in common the low cost and the possibility to be configured as you like, but it is what distinguishes it to fascinate: the Raspberry Pi is a real computer, supporting a real operating system, with all the features to make it extremely easy and fun to work with complex electronic projects. The real strength of this boards is that we can easily interface electronics with high-level applications, such as a web server. For example, you can develop a website in which you plan garden irrigation, manage the lights of home or read the load voltage. Another example could be to check out our emails, turning on a LED if there is an unread mail (you will see this example in the part 3 of this article). Another further example could be to write weather forecasts on a LCD display and why not, turn on the stereo and put on a playlist of songs when we get home … The possibilities are almost endless! The aim of this article In this article, you will follow step-by-step the procedure to successfully install and configure the Raspberry Pi and then you will learn how to write some simple programs to control a circuit with LEDs and button. It is not required any special knowledge of Linux, python, or electronics, but from the time when I wrote this article (September 2013) to when you put your hands on your first Raspi, many thing could be changed. Thus, this guide is only an introduction and if you want to make the most of the Rasperry Pi (and ease of use), you need to learn about new features added over time. For any questions about programming and using the Linux terminal, Google is your best ally. On the internet you will find many forums and chat rooms where you can get information or ask questions. The best starting point for everything is still the official website of the Raspberry Pi, found at:http://www.raspberrypi.org/
The Raspberry Pi
The Raspberry Pi or Raspi for friends – it’s a small computer. It has everything you could want: a 700MHz ARM processor, RAM, USB, Ethernet, but especially a comb (see Fig.3) is welded on the electronics board and it is directly connected to the processor. This comb allows us with digital inputs / outputs (freely configurable) controlled directly by the operating system. There are two versions of the Raspi, the model A and B. The difference lies in the hardware, the model B, compared to its little brother, has in addition an Ethernet connector, two USB ports instead of one, and bigger RAM (512MB against 256Mb of the model A). Obviously, the price is different: at present, the B model can be purchased for € 37, while model A costs only € 28. Model A is lighter and therefore it is ideal for embedded applications (dedicated) where weight is an issue and where the extra features of model B are superfluous. On the other hand, model B is much more versatile: it can be connected to the computer network and it can handle more applications and processes than model A. You can purchase Raspberry Pi from RS or from a large number of distributors that you find here.
Hardware
But then with the 37 € what I bring home? A beautiful board, all things considered.
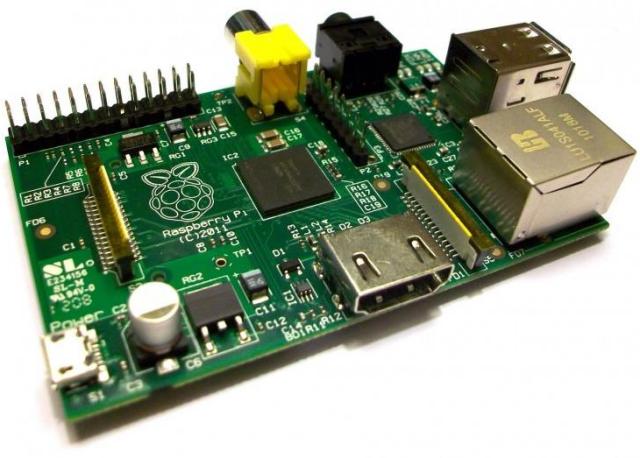
The dimensions are those of a credit card (8.6cm x 5.4cm x 1.7cm), with on-board:
- Processor Broadcom BCM2835 full HD [+]
- ARM CPU 700MHz (overcloackable up to 800MHz)
- 512MB SDRAM
- Ethernet port 10/100 (RJ45)
- Two USB 2.0 connectors
- HDMI and composite video output
- 3.5mm audio jack and HDMI output
- SD Card Slot
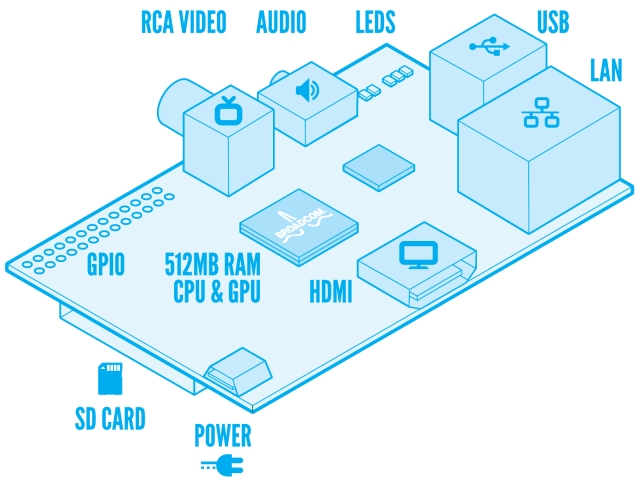
Power is supplied via MicroUSB with a suitable power supply. Model B requires 5 V voltage and a minimum of 700 mA of current [+]. Actually, for our purposes, the battery charger of the cell phone is more than enough. But remember that if you are going to “squeeze” the Raspberry Pi with projects requiring a lot of resources (such as the XBMC media center, or the Raspi version of RaspBMC), you will need a greater power supply. If you do not like to risks, at the time of purchase, you will certainly find a suitable power supply in the list of “things that your RaspberryPi absolutely needs” between the various boxes of plastic and SD cards. In order to check that there are no power supply problems, and therefore your power supply does not “sit” delivering a constant voltage of 5V to the Raspberry Pi board, there are two places specially designed to insert the probes of the multimeter and check the input power. On the board they are named TP1 for the positive probe and TP2 for the negative probe [+]. GPIO Or rather… those thirty pitches that really interest us. The General Purpose Input / Output pins (called simply GPIO) are the BCM2835 contacts that can be programmed as you like. They can be inputs or outputs, and they can be configured to communicate with other devices using protocols such as UART, I2C, SPI, etc., or can be configured as PWM outputs. On the Raspberry Pi board, these pins are connected to the comb P1.

WARNINGS:
- The microprocessor is directly connected to the comb and there are no protections of any kind between them.
- Every single pin can provide or absorb up to 16 mA of current [+]
- The maximum current supplied from pins 3.3 V is 50 mA in total [+] (3 mA for each GPIO)
- NEVER connect a cable with a voltage higher than 3.3V at a GPIO pin: the BCM is not designed to work with voltages larger and you risk to permanently damage your Raspi.
- Always double-check your circuit before powering.
- Always calculate the currents and do not exceed the specified thresholds or you irreparably burn the processor or the voltage regulator.
Other contacts
Among other things that may be useful on the Raspi board there are:
- Jumper P6: it is composed of two pitches, one for the reset signal and the other for the 0V. Bridging these two contacts you restart the processor Raspi. This jumper is not soldered by the factory.
- Connector P5: it is useful if you want to add a second I2C or a handshake line for the UART. This connector is not soldered by the factory.
Other connectors that may be useful for more complex projects are S2, used as DSI (Display Serial Interface) [+] to connect some LCD or OLED compatible for embedded applications [+], and S5 connector that provides a connection MIPI / CIS [+] for video cameras compatible [+]. For a full list of the Raspberry Pi hardware and all its specifications, refer to these links:
Under the lens
Now let’s take a quick look at some electronic features of the board. POWER SUPPLY

The first thing you will notice about this corner of the board, is that its power supply 3.3 V is trivially composed of some capacitor and a linear regulator[+]. Many electronic modelers have complained of this solution, mainly because linear regulators are less efficient than switching regulators and thus batteries are affected. Obviously, the reason why the linear regulator has been adopted is the lower cost. For this reason, on the Internet there are several do-it-yourself guides to use a switching regulator instead of the original[+]. On the board there are two other regulators: RG1 and RG3, providing, respectively, 1.8 V and 2.5 V. PROCESSOR
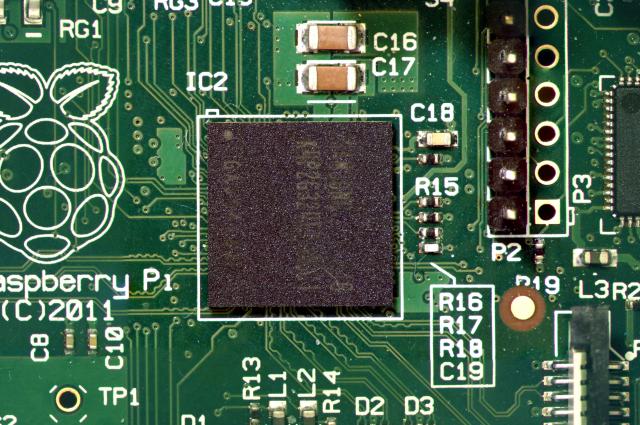
These two lines are just to remind you that the processor is mounted under the component that reads the code. Many times you hear of someone who wonders why the Broadcom mark with BCM2835 are not printed over the component. The answer is simply that to save space the SDRAM chip is mounted directly over the microprocessor and thus the acronym you see on the component is simply the model of the installed memory. LAN AND USB

The other integrated circuit on the card is a SMSC LAN9512. Since the BCM2835 does not handle natively the Ethernet connection[+], this integrated circuit takes care of passing the data from Ethernet to the USB bus of the microprocessor. In this way, the LAN9512 is recognized by the operating system as an Ethernet adapter and as USB HUB. In fact, it is also connected to the two USB ports on the board.
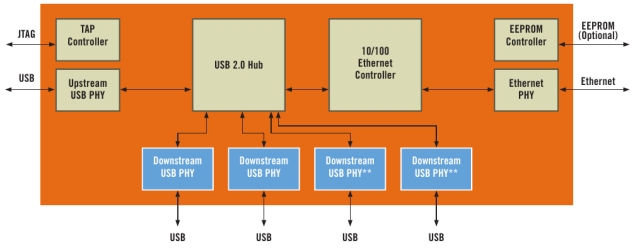
The BCM2835 has a single USB bus and thus the LAN9512 is the main bottleneck in the management of the data flow of our Raspi. THE OTHER SIDE Turning upside down the Raspi board, the only interesting things that can be found, including resistors and capacitors, are the two quartz oscillators X1 (25MHz) and X2 (19.2 MHz), which deal respectively with the clock of LAN9512 and BCM2835[+]. DATASHEETS AND SCHEMATICS Fortunately the guys of Raspberry Pi Foundation have decided to create an open-source system where we can access to find all the documents we might need:
Software
The Raspberry Pi has quickly become very popular among hobbyists, both for the low price and for its great versatility. This is especially true if you think back to when the production of this board was announced and you had to put on waiting lists for expecting even six months before you can get a board. The ARM processor supports many operating systems (mostly Linux-based), and this allows everyone to work in his preferred environment. No, Windows is not compatible with ARM and even if it were, would you use it on really such a thing? Imagine how many blue screens … it would always be locked. And no, not even OSX is going to run on ARM! After the first Raspi was delivered around the world, many developers vied to recompile the kernel of the most popular Linux distributions specifically for the hardware of this board, and in fact, we now have a substantial amount of operating systems adapted to give the best performance on the Raspberry Pi board. Among the most famous operating systems adapted to work with Raspberry, there are:
- Raspbian (a lighter version of Debian),
- Pidora (daughter of the most famous Fedora),
- Arch Linux ARM (review of Arch Linux).
Then there are operating systems that run natively, such as Android 4.0,Google Chromium OS, some UNIX distributions such as Free BSD and many others (for the complete list see here). The site RaspberryPi.org has its own official list of supported operating systems that you can find here. The RaspberryPi.org site has its own official list of supported operating systems that you can find here. In this article we will see how to install and configure Raspbian. I chose this distribution because Debian (the mother of Raspbian) is very famous and is well documented, so it is easier to find solutions and support in case of problems during use. With this operating system you can easily achieve interesting applications such as a media center, a web server, a mail server, torrent, databases, ftp … and all this is shareable with all the electronics you want. Today, however, you will do only the first step, you will learn to control the outputs and read the inputs of the GPIO using the python language and a few lines of code.
Let’s get to business
What we need
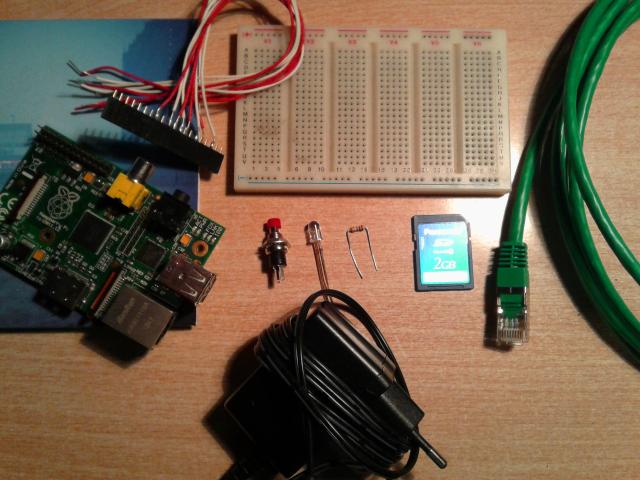
Before you start you need to recover all the material that will be useful:
- a Raspberry Pi
- MicroUSB power supply (that is what was said in the Hardware section)
- An SD card of at least 2GB
- A computer with an SD card reader
- An HDMI cable or composite
- A monitor / TV with an HDMI input or composite
- A USB keyboard
- An Ethernet cable
- A comb from at least 13 female contacts
- A breadboard
- A common LED
- A resistor (whose value will calculate later)
- A button for board
- A good music to keep you company (essential)
Let’s install the operating system As previously mentioned, we will use Raspbian as OS, a Linux distribution rebuilt by Debian. At the time of this article, I have noticed that the official website of the Raspberry Pi suggests the installer NOOBS for new users. In this guide, we’ll skip this procedure (which basically allows you to choose which OS to load on Raspi) and go directly to install the RAW image of Raspian. Let’s start by downloading the image Raspbian that we will load on the SD card. The list of all OS and links can be found at this link: http://www.raspberrypi.org/downloads
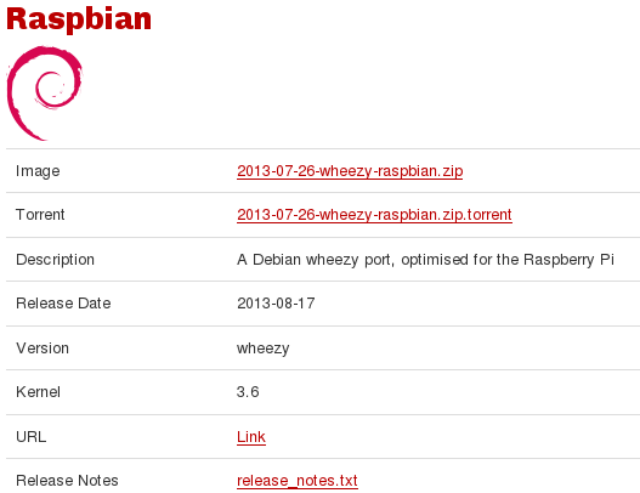
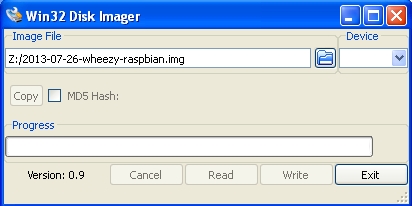
The first link is the direct link to the zip file of the image, and clicking on it you can download the file directly from the server raspberrypi.org, whereas the second link is a torrent, usable with torrent clients like BitTorrent, Vuze, and utorrent. The downloading with torrents is usually faster than direct. Once you have downloaded the zip file, extract the content. Now you have a file of around 1.8 GB with the .img as an extension. This file must be loaded on the SD card. Obviously you do not have to copy and paste in the SD card, it would be too easy, you have to use a specific tool. Windows The procedure for preparing the SD card from windows procedure is as follows:
- Download the Win32Diskimager tool.
- Extract it in a folder and run the executable.
- In Image File, select the Raspbian image you have previously downloaded and extracted.
- In Device, select your SD card; but be careful not to select one of the hard drives otherwise the tool will overwrite the data thus risking losing them.
- Click on Write.
Linux For fans of the penguin, just run the command:sudo dd bs=4M if=~/raspbian.img of=/dev/schedaSD
if represents the path of the source file (Raspbian image), whereas of is the destination (SD card). If you are unsure of the path of your card you can find it by running the command:sudo lshw -class disk
Under the heading “logical name” you will find the right path. Again, be careful not to mistake the path or you’ll end up overwriting a hard drive. The process of writing an image on SD card takes about 5/6 minutes, during which I recommend reading one of these fantastic articles. Once the SD card is ready, it’s time to dedicate to the Raspi. Connect the keyboard and monitor, insert the SD card and plug in. If you are near the home router you can also connect the Ethernet cable, but is not essential.
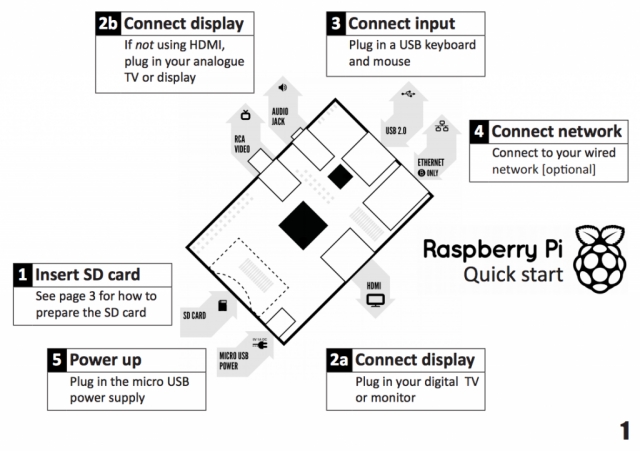
If the SD card has been properly well, at startup, a red LED PWR (power connected) and a green LED ACT (SD card access) will light up on the Raspi board. After a few seconds the Raspberry logo will appear on the screen along with a series of writings informing you on the state of the operating system. If this is the first time you start the system, a screen with configuration options will be displayed.
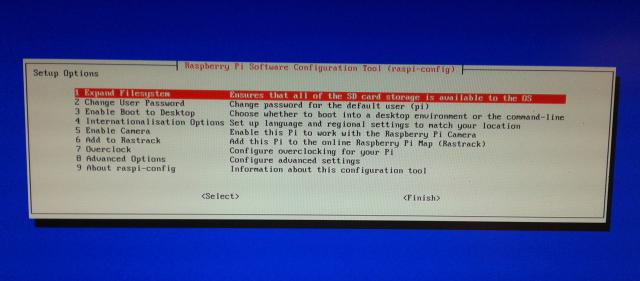
Initially, the operating system has only 1.8 GB of available memory (the size of the image we copied on the card). By selecting the first option in the menu, you will expand the memory to the capacity of the SD card. Thus, press ENTER, and let the procedure end. When finished, the same startup screen will be resubmitted. By selecting Change User Password you will change the password for accessing to the Raspberry Pi. The default password (raspberry) can also be changed later. By selecting Enable Boot to Desktop, you set the boot of the graphical interface at the Raspi startup. This option is useful if you want to use Raspi as a PC. Thus, you will work with mouse and keyboard, and in an environment more similar to a desktop.
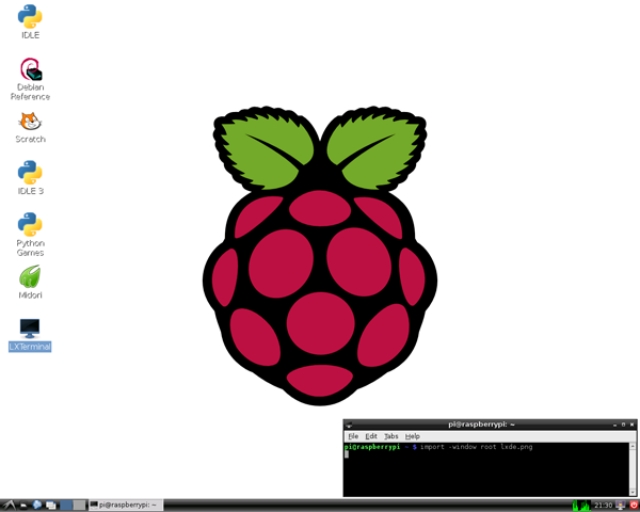
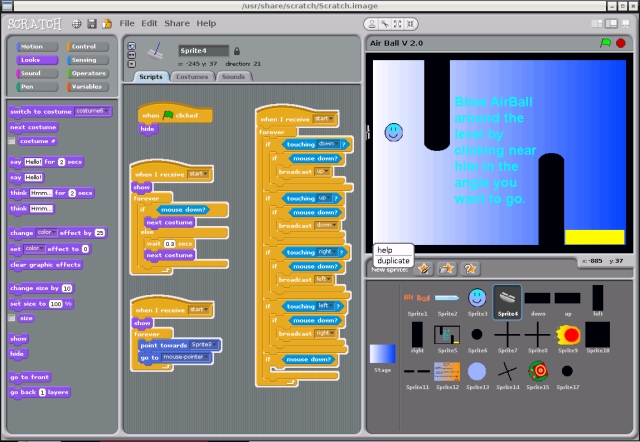
In this article, I will not talk about the use of the graphic interface, because I’m going to control the Raspi from my personal computer. Thus, in this case, the GUI would become unnecessary and it would only be a waste of resources. The graphical interface is designed to create a work environment more user friendly (remember that the Raspberry Pi is designed to teach children to program without having to buy an expensive laptop) and is full of tools to write programs in a few simple moves.
The fourth option, Internationalisation Options, allows you to change the language and keyboard layout. If you do not like the English and/or if you plan to use the Raspi with graphical environment, select this item and follow the wizard to configure the parameters. Enable Camera is the option to enable and configure the optional camera (if you have purchased), Add to Restrack is a small procedure that allows you to register your Raspi on Rastrack, which is nothing more than a site in which the position of the Raspberry Pi sold worldwide is displayed graphically. This procedure is optional and does not involve any advantage or disadvantage. You generally register your Raspi only to contribute to the expansion of the map. Note that for concluding the registration, your Raspi must already be connected to the Internet. Alternatively you can register it at a later time directly from the site. Continuing with the options, you find the Overclock option. As previously mentioned, the Raspberry Pi can be overclocked up to 800MHz. By pushing the processor at this frequency you will consume it more quickly and no guarantee will save you. This option is to be used only if it is strictly necessary and however it need to be changed at a later time. Finally, you find Advanced Options. Press ENTER to access to a submenu.

At this point we have a few other options:
- Overscan to fix any compatibility issues HDMI.
- Hostname to change the name of the Raspberry Pi in the local network and in the terminal command.
- Memory Split to decide how much RAM to allocate to the graphics processor.
- SSH to enable the SSH server.
- Update to update the installation tool (useful if you have an old distribution downloaded long ago).
Select SSH to activate the server. SSH is the protocol that allows us to send commands to Raspi (or any machine with an SSH server on) directly from the keyboard of our PC. SSH stands for Secure SHell, and it is the evolution of telnet. Compared to telnet, SSH provides an encrypted connection (telnet communicates in clear, including passwords!) and uses a process of public key authentication[+]. Once you have finished to set all the options, select Back (with TAB) and the Finish. Restart the Raspberry Pi when prompted. If you intend to use the Raspi locally, leave connected keyboard and monitor and, if you have not already done, connect the Ethernet cable between the router and the Raspi. Instead, if you plan to use the commands from the remote, you can unplug everything except power and Ethernet cable. An internet connection is only used to make first-time installations and upgrades, so if you work locally, you can leave the Pi disconnected from the network once the procedure is finished, but if you work remotely, of course, the power cable must always be connected .
With this, the first of three parts of the article ends here. In the next articles you will see:
- how to connect to Pi and access to it.
- Basic commands
- how to use the first circuit and the first program in Python with Raspberry
and finally you will see a whole series of examples. So, see you soon![:]