
Introduction
In a previous article (see here ) you’ve already seen how to integrate a generic liquid crystal display LCD1602 in your projects with Arduino. In this article you’ll see how to do the same thing with another LCD module: LCD03.
In this case you will use another library Arduino, specific only for this model. Also you will see that the power of this module is mainly the possibility of directly integrating a keypad. This option greatly expands the opportunities for viable projects of Arduino.
The liquid crystal display – LCD 1603
This LCD module is available in two different versions, the 20×4 and the 16×2 characters, both with the backlight screen or blue or green.
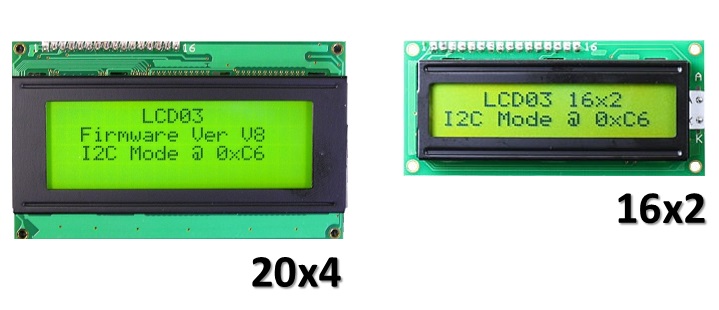
This module has already integrated the board that handles the I2C communication. This is done using the default address 0xC6.
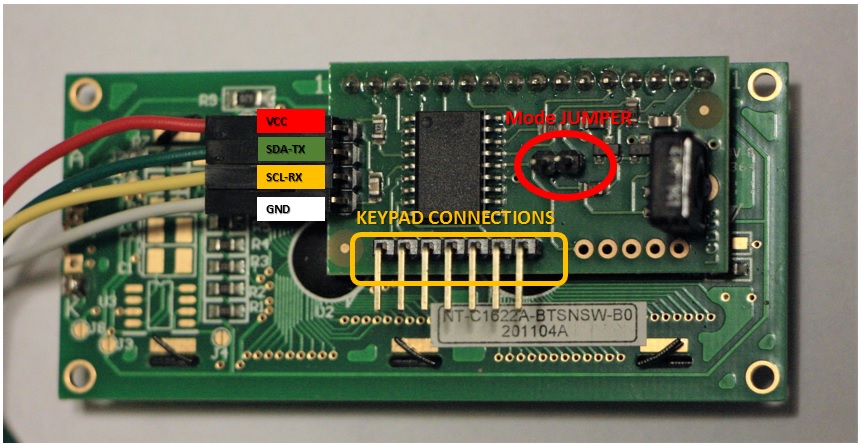
As you can see from the figure there are four side pin. Two for VCC and GND power supply, and two for the I2C communication.
In addition there are also two pins to insert a jumper (jumper mode). If the jumper is not present, the communication will be through I2C, but if it is present, communication is serial.
In addition, the greater potential of this card is the ability to manage a keypad directly from the LCD. In fact there are the 7-pin predisposed for connecting to a keypad.
The connections were made specially for a perfect integration of a 7-channel bus which goes directly from the keypad to the board.
If you are interested in further technical information in this regard, I recommend visiting this page.
Build the circuit
Before you start planning it all, you must first make all connections. First connect the Arduino board and LCD03
| Arduino UNO/ZERO | LCD03 |
| GND | GND |
| 5V | VCC |
| A4 | SDA |
| A5 | SCL |
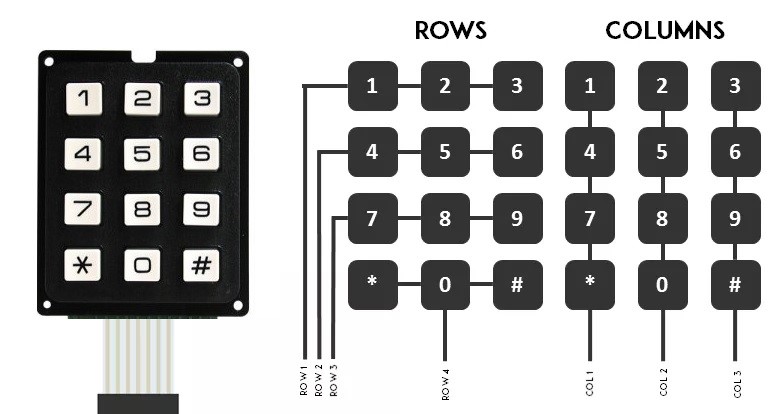
Then connect a keypad to the LCD03 board following the diagram in Figure

The Arduino LCD03 library
In order to use the LCD03 board with Arduino, it was made a separate library, called LCD03. You can download it directly from here arduino-lcd03-1.0 , otherwise you can go to GitHub and download the source code
$ cd ~/Documents/Arduino/libraries
$ git clone git://github.com/andatche/arduino-lcd03.git LCD03
or you can get more information on the developer’s page: andatche.
Once you have downloaded the library, you can integrate the library directly on Arduino IDE, by selecting Sketch > include Library > Add .ZIP library from the menu.

First, you will develop a simple Hello World program. This simple sketch will make a connection between Arduino and I2C LCD display and then print a text on two lines. The first line of “I’m Arduino” and second “Hello world!”
Here’s the sketch:
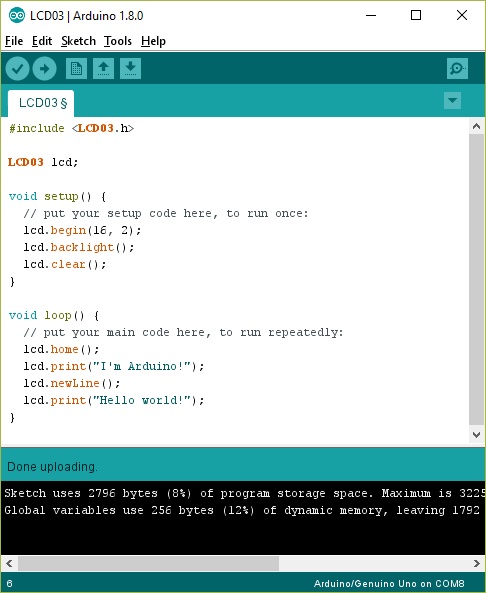
#include <LCD03.h>

LCD03 lcd;

void setup() {
 // put your setup code here, to run once:
 lcd.begin(16, 2);
 lcd.backlight();
 lcd.clear();
}

void loop() {
 // put your main code here, to run repeatedly:
 lcd.home();
 lcd.print("I'm Arduino!");
 lcd.newLine();
 lcd.print("Hello world!");
}
If you run the program you will see come on LCD03 with the backlight and then show the message “I’m Arduino” on the first line and “Hello world!” on the second.

Integrating Keypad
Now the second step will be to program Arduino, or rather the LCD03 integrated board for to listen to any key presses. Thanks to the library LCD03 the management of this type of event is really simple.
Now you’ll see a simple example in which pressing the 1 key or the 2 key will have the answer on the screen. This tutorial is very simple but it opens the way for many applications. You can replace the code within each pressure condition with what you want.

Here you can copy the code
#include <LCD03.h>
LCD03 lcd;

void setup() {
 // put your setup code here, to run once:
 lcd.begin(16, 2);
 lcd.backlight();
 reset();
}

void loop() {
 // Read the current state of the keypad
 uint16_t keystate = lcd.readKeypad();

if(keystate == KEYPAD_1) {
 lcd.clear();
 lcd.home();
 lcd.print("Button1 pressed!");
 delay(1000);
 reset();
 }

if(keystate == KEYPAD_2) {
 lcd.clear();
 lcd.home();
 lcd.print("Button2 pressed!");
 delay(1000);
 reset();
 }
}

void reset(){
 lcd.clear();
 lcd.home();
 lcd.print("I'm ready!");
}
Executing it…


If you want to add more buttons, here is a list of the corresponding constants:
- KEYPAD_1
- KEYPAD_2
- KEYPAD_3
- KEYPAD_4
- KEYPAD_5
- KEYPAD_6
- KEYPAD_7
- KEYPAD_8
- KEYPAD_9
- KEYPAD_0
- KEYPAD_STAR
- KEYPAD_HASH
While if you want to put a condition in which two buttons are pressed simultaneously. For example 1 and *, add this condition.
if(keystate == (KEYPAD_1 | KEYPAD_STAR)) {
// insert the code here
}
Conclusions
In this article, you saw how to use a keypad that has a screen LCD LCD occupying only two pins on the Arduino. This is very important since the availability of pins is always necessary in order to enrich the possibility of using sensors and other additional components to Arduino.[: