
This article begins a series of posts, or rather, lessons on the programming of Arduino boards. The basic language we will use is the C language, a programming language that has made the history of computing and that many of us have used to develop many projects on many other platforms. However, it is not enough to have some notions of C to be able to program in Arduino. In fact, as you will see, it will also be important to know many concepts related to the world of electronics and some particular constructs that the C language assumes in order to define them.
You will therefore be able to take advantage of this series of articles to become more familiar with Arduino programming, and for those who do not know C language it will be an excellent opportunity to start learning it from scratch.
The Structure of a Program (Sketch) in Arduino
To begin with Let’s see together the first differences regarding the world of Arduino and how a program is conceived and structured.
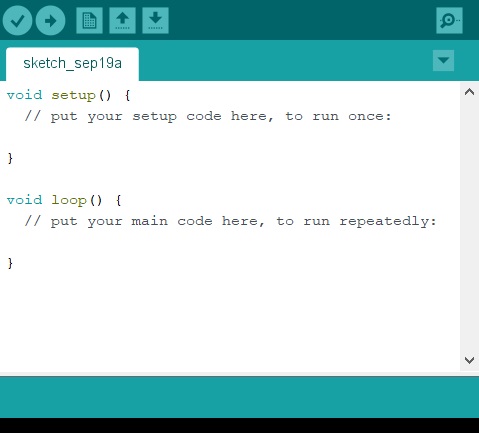
The Sketch as. Ino
If you come from the world of programming, you will certainly be familiar with the concept of a program: a series of code implemented through a particular programming language that is compiled (or interpreted) for the purpose of performing a certain operation or Application.
As for the world of Arduino, a list of code that is then compiled and executed is referred to as Sketch. In addition, you will generally be used to having C programs with the extension. C (or. cpp for C++), but as far as Arduino is concerned, these files will be pollution in the file system with. Ino as an extension.
The Setup-Loop structure
The basic structure of an Arduino sketch is based mainly on the definition of two functions:
- void Setup ()
- void Loop ()
These two functions are the basis of any program, or sketch, which must be implemented and then compiled on Arduino, simple or complex.
The setup () function is the first to be invoked during sketch execution. In This function all the variables and functions that are necessary to start the program correctly are defined and implemented.
You will then have the initialization of variables, the definition of constants, the control and activation of the pins or peripherals connected to the Arduino board. A classic example is to set all the parameters necessary to create a serial connection with an external device and then call a function to establish this connection with the device.
Then, within the setup () function, you will implement all the code necessary to set up and perform all the operations necessary to start the actual program at full speed.
All the code that instead implements the routine operations of the program, is often in the case of Arduino, a repetitive operation and will be defined within the loop () function.
This concept will be clear to you by looking at the operating scheme shown in the following figure:
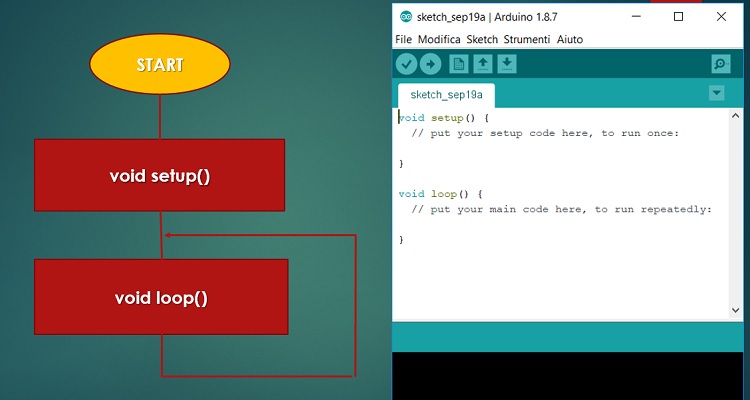
From the diagram shown above, it is easy to understand that in the reality of the program in Arduino, it does not have the classic evolution, initialization, operation and conclusion with the final interruption of the execution, but an initialization at the time of the Machine ignition, and an infinite loop that will stop when the machine is switched off or when the reset button is pressed.
For Those who are beginners with electronic cards, especially Arduino, may be that sometimes arduino remains in an inactive state. In reality, Arduino is waiting, or rather listening, in an eternal loop, with a particular event that triggers (triggering) and a certain operation of response.
But Let’s see some examples
Example with Setup
void Setup () {
   Serial. Begin (9600);
   Pinmode (3, OUTPUT);
}
In this example you can see some common instructions that you will find in many sketches for Arduino. For example serial. Begin () is often used to set the speed of a serial communication (in this case 9600 baud) that we need to establish to make our program work. Pinmode () is a function that activates one of the pins on the card (pin 3 in this case) to act as a signal output (output).
Example with Loop ()
After the instructions inside the setup function have been executed, Arduino begins to execute the loop () function cyclically.
void Loop () {
   Digitalwrite (3, HIGH);
   Delay (1000);
   Digitalwrite (3, LOW);
   Delay (1000);
}
Elements of a sketch and related syntax
Istructions
Sketches, therefore, even if structured in Setup () and loop () are real programs consisting of a list of instructions. The instructions are the basic element on which the programs are built, and in the C language they can be easily recognized because they are always concluded by a semicolon (;).
The character ‘; ‘ It must always be added and it is necessary for the compiler to recognize in the text a part of the code corresponding to a single instruction. Failure to add this character will result in an error when compiling or (worse) an incorrect interpretation of the instructions entered.
A block of instructions
A block of instructions is a group of instructions enclosed within two braces:
{Block of instructions}
You saw this earlier with the loop () and setup () functions, whose behavior was defined as running from the sequence of instructions contained within two curly brackets.
void Loop () {
block of instructions;
}
Blocks of instructions are not only used to define the functionalities of a function, but are also used in many other cases. For example, they are used when dealing with decision-making instructions and with for loops.
for (int i = 0; i< n; i++) { n;=”” i++)=””></ n; i++) {>
block of instructions;
}
In this case the block of instructions will be executed many times (more precisely n times).
Comments
Another element contained within a program, and therefore also in a sketch is the comment. The comments are nothing more than texts inserted inside the code but that are ignored by both the comilator and the execution of the instructions.
But Why then insert some text into the program, if it is not read by the compilers? Well, the comments have a very useful function: they serve to give information to the “human” reader about the code reported in the program, such as the functionality of a block of instructions, the name of the developer, the date and the version of the sketch , important notes on the meaning of some parameters or constants, etc. Etc.
A good code is not only written with a correct and elegant syntax, but is also provided with all the information, through comments, which make the program more readable and maintainable (especially for developers who have to deal with programs written by other people previously).
In C, and therefore also in sketches, to define comments within the code there are 2 possibilities:
/*
This type of comment is suitable
To write text on multiple rows
*/
And this
This comment is short and stands on one row
Conclusions
In This introductory article you have seen how to implement programs on Arduino through sketches, how they are structured and what elements are composed. In the next article you will see the functions, how they are implemented and what role they play in programming[:]