
Introduction
From the previous articles, you saw how to individually use the PiCamera webcam and the PIR Motion Detector through the Raspberry Pi board. In this article you will see how to combine the two to get a simple example of a surveillance system: When motion is detected in the room, a picture is taken to see who is the intruder.
I suggest you review the following items.
- The PIR motion detector – a sensor for Raspberry (2nd part)
- PiCamera & Python – programming a webcam on Raspberry Pi
Installing the PIR Motion Detector
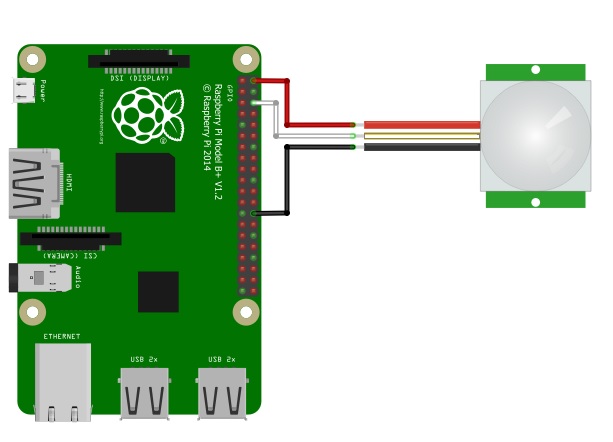
In this article, you connect the PIR motion detector to Raspberry board using a simpler scheme, ie without using the breadboard or the pull-up resistor. In fact you can connect all the wire jumpers directly to the GPIO pin as shown in the diagram below.
Once you have connected the PIR, you can start the Raspberry Pi. Then open a command session from the terminal and open the file shown in the article PIR motion detector.
$ nano pir01.py
For convenience, the code is shown below, putting in bold the code to be added if you want to work without a breadboard and the resistance.
import RPi.GPIO as GPIO
import time

GPIO.setmode(GPIO.BCM)

pirPin = 7
GPIO.setup(pirPin, GPIO.IN, GPIO.PUD_UP)

while True:
    if GPIO.input(pirPin) == GPIO.LOW:
        print "Motion detected!"
    else:
        print "No motion"
    time.sleep(0.2)
If you want to run programs in Python using the GPIO pins, remember to do it as sudo.
$ sudo python pir01.py
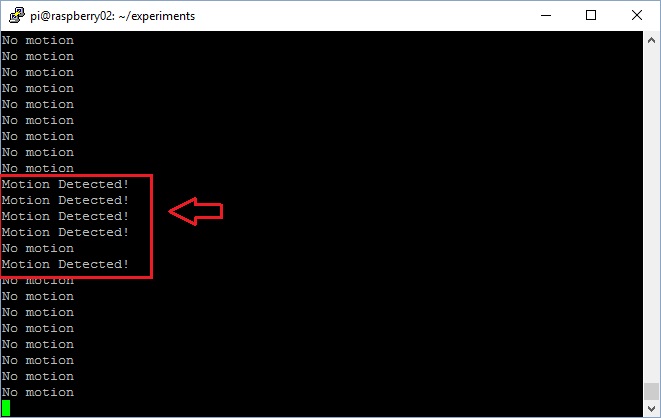
The program immediately begins to write “No Motion”. Each time the PIR sensor detects motion, you’ll get the message “Motion Detected!”.
A phot for each movement detected
Now you will modify the above example in order to take a picture every time the PIR detects motion in the room. This way you can understand what will be the origin of the movement (the intruder in your room!)
Copy the old file and rename pir02.py.
$ cp pir01.py pir02.py
Now make the necessary changes to integrate the use of the Pi room with the previous program (additions in bold).
import RPi.GPIO as GPIO
import time
from picamera import PiCamera

GPIO.setmode(GPIO.BCM)

pirPin = 7
GPIO.setup(pirPin, GPIO.IN, GPIO.PUD_UP)
camera = PiCamera()
counter = 1

while True:
    if GPIO.input(pirPin) == GPIO.LOW:
        try:
                      camera.start_preview()
                      time.sleep(1)
                      camera.capture('/home/pi/image%s.jpg' % counter)
                      counter = counter + 1
                      camera.stop_preview()
                  except:
                      camera.stop_preview()
    time.sleep(3)
First, you’ve added the PiCamera form to use the webcam. Then hai0 you set the reference variable to your PiCamera. When the PIR sensor detects motion, it activates the webcam Raspberry, waits for just a second to adjust brightness and then takes the shot. Then turn off the preview of the camera.
Also you need to handle the exception (for example, when I interrupt the program execution with CTRL + C) to prevent the webcam remains active even after the program ends.
Recording a surveillance video
In the previous example you saw how to take pictures with every movement detected. A more advanced way is to record a short video instead of a picture to record the moving subject and understand better what he is doing. To test I set a duration of five seconds, but you can increase this time.
import RPi.GPIO as GPIO
import time
from picamera import PiCamera

GPIO.setmode(GPIO.BCM)

pirPin = 7
GPIO.setup(pirPin, GPIO.IN, GPIO.PUD_UP)
camera = PiCamera()
counter = 1

while True:
    if GPIO.input(pirPin) == GPIO.LOW:
        try:
            camera.start_preview()
            camera.start_recording('/home/pi/video%s.h264' % counter)
            counter = counter + 1
            time.sleep(5)
            camera.stop_recording()
            camera.stop_preview()
        except:
            camera.stop_preview()
    time.sleep(3)
Remember to run the program like sudo, because you’re using the GPIO pins.
$ sudo python pir03.py
To stop, press CTRL + C.
A shrewdness: turn off LED activation of PiCamera WebCam
If you really want to activate a surveillance camera to find out stealthily moves, perhaps it would be better to disable the LED that lights up whenever the web camera is activated. This is possible by entering the following command:
$ sudo nano /boot/config.txt
and adding at the end of the file, the following configuration line
disable_camera_led=1
Save, and then reboot the system to set the new configuration.
$ sudo reboot
Conclusions
With this article you saw the foundation to develop programs to control a video surveillance webcam to be installed in a room. If there had been an inspiration for a project do not hesitate to post it on Meccanismo Complesso.
Pingback: Projet n°3 Détection de mouvement avec envoi d’E- mail – Super Méga Top