
Introduction
In previous articles you saw a general overview on using the integrable webcam on Raspberry board: the PiCamera. In addition, you become familiar with it, writing examples in Python (see here) and a tutorial you saw how to use it as a security camera (see here).
In this article, you will deepen some topics on picamera Library: how to configure the webcam settings and how to add text on the image. You write a series of examples in Python to get familiar with these concepts. Finally, to conclude, a summary example about Video Surveillance with PiCamera – how to add the current time while shooting a video.
Modify the PiCamera settings
Before starting with the true examples, you must be aware of some configurations regarding the picamera. In fact, when you take a picture using the webcam, the scanned image quality can depend on many factors.
The resolution is the most important factor to be controlled if you want to shoot videos or capture the images properly. The resolution is an indicator of how the picture is defined in detail, or rather how many pixels are necessary to define an image. The more of these pixels, the higher the resolution, the greater the detail in the picture.
As for the PiCamera, you can define different resolutions before you capture an image or video. The following Table has been taken from the official website of the Picamera library. The table clearly illustrates the possible resolutions to be set to capture video or images properly.
| # | Resolution | Aspect Ratio | Framerates | Video | Image | FoV | Binning |
|---|---|---|---|---|---|---|---|
| 1 | 1920×1080 | 16:9 | 1-30fps | x | Partial | None | |
| 2 | 2592×1944 | 4:3 | 1-15fps | x | x | Full | None |
| 3 | 2592×1944 | 4:3 | 0.1666-1fps | x | x | Full | None |
| 4 | 1296×972 | 4:3 | 1-42fps | x | Full | 2×2 | |
| 5 | 1296×730 | 16:9 | 1-49fps | x | Full | 2×2 | |
| 6 | 640×480 | 4:3 | 42.1-60fps | x | Full | 4×4 | |
| 7 | 640×480 | 4:3 | 60.1-90fps | x | Full | 4×4 |
Open a new file with a text editor, and name it, for example, picamera01.py.
nano picamera01.py
First, you need to add the imports and the definition of PiCamera. In this example you will set the resolution 2592 x 1944 as indicated in the table for the acquisition of images.
from picamera import PiCamera
import time

camera = PiCamera()
camera.resolution = (2592, 1944)
Then write the following code
camera.start_preview()
time.sleep(5)
camera.capture('image01.jpg')
camera.stop_preview()
If you followed the previous tutorials in other articles, the commands in the code will be familiar. Run the code and you’ll get an image of 2592 x 1944 pixels as a JGP file with about 2.4MB of size.
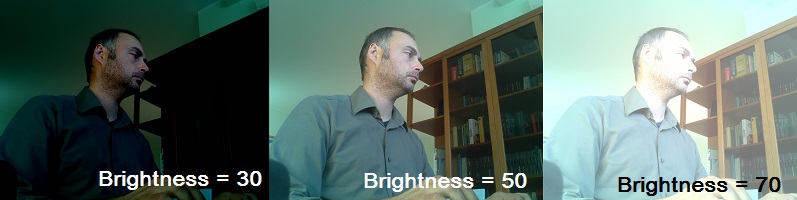
Another important factor to consider is the brightness (brightness). This value can be defined within the code, expressed through the brightness parameter of PiCamera. This value can assume all values between 0 and 100. If not specified in the code, the default value is 50 (pictured above). Try to set two different values, specifying a darker image (brightness = 30) and a clearer image (brightness = 70).
In the code you can specify brightness just after the resolution setting.
camera = PiCamera()
camera.resolution = (2592, 1944)
camera.brightness = 30
The image below illustrates the differences in brightness for the three different values.
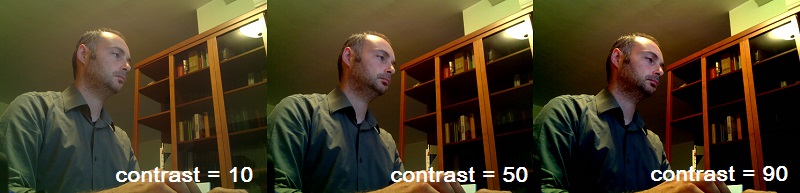
Similarly, you can adjust the contrast. This value is expressed by a contrast parameter of PiCamera and can take values between 0 and 100. The default value is 50.
Repeat the above example, resetting brightness to 50 (not declaring it in the code) and varying the contrast (to enhance the effect choose 10 and 90 as the comparison values).
Adding a text to an image
Now that you’ve seen how to set configurations of webcame, you can finally begin to work on a more practical example: write lyrics over an image or a movie. So you modificherai the above code to ensure that a text will be added at the top in the picture is, for example, “I am what I am.”
Open a new file with a text editor, and name it, for example, textonimage.py.
nano textonimage.py
First add more and imports of the modules and the definition of PiCamera in the first part of the code.
from picamera import PiCamera
import time
camera = PiCamera()
camera.resolution = (2592, 1944)
camera.start_preview()
camera.annotate_text = "I am what I am"
time.sleep(5)
camera.capture('image02.jpg')
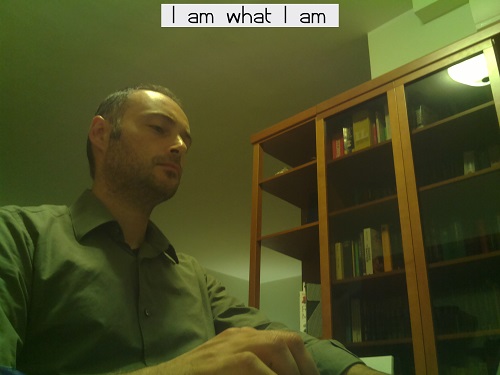
camera.stop_preview()Running the above code will get a picture like the following one.
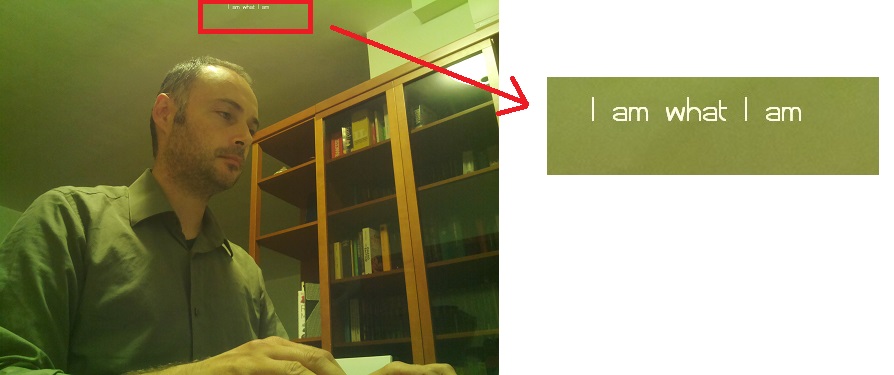
I must say that the writing is really small compared to the image. This is due to the fact that the resolution is at maximum. In fact, if you lower the resolution the inscription will have a different dimension. But instead of changing the resolution, the more correct way is to change the size of the text through the annotate_text_size parameter. This value is 32 by default, and can assume values ranging from 6 to 160.
Given the so tiny size, set this value to 120 and see what happens.
camera.annotate_text_size = 120
By running the program you will finally have a text with readable size.

Now that you’ve set the font size, you can also set its color. If you do not like the white, you can replace it with any color by adding some additional statements in the code. Import Color class of PiCamera module, and sets the annotate_foreground parameter, which corresponds to the color of the text. The writing is on transparency, but if instead you want to set the background with a color, set the annotate_background parameter.
from picamera import PiCamera
from picamera import Color
import time

camera = PiCamera()
camera.resolution = (2592, 1944)

camera.start_preview()
camera.annotate_size = 120
camera.annotate_foreground = Color('black')
camera.annotate_background = Color('white')
camera.annotate_text = " I am what I am "
time.sleep(5)
camera.capture('image02.jpg')
camera.stop_preview()
By running the code you will get a picture like the following.
If right now you’re probably wondering … and now how can I move the message? Well, unfortunately this is not possible with picamera. The hope is in the next release, or the solution is to use another Python library that works on the images already captured (not at the time of acquisition). But this is not what we set out in this article. What we want is a writing tool when capturing video.
Add text to a video
Now that you know how to capture an image with a text, the next step will be to do it with a video.
Open a file with a text editor and save it as textonvideo.py.
from picamera import PiCamera
import time

camera = PiCamera()
camera.resolution = (1280, 720)

camera.start_preview()
camera.annotate_text = "I am what I am"
camera.start_recording('video.h264')
time.sleep(10)
camera.stop_recording()
camera.stop_preview()
By running the program you will find a video.h264 files on the current directory. If you want to convert it to MP4 format, run the command.
MP4Box -fps 30 -add video.h264 video.mp4
If you do not have installed on MP4Box Raspbian, you can install it:
$ sudo apt-get install -y gpac
The video will show “I am what I am” at the top for its entire duration.
Example of Video Surveillance – Add the current time to a video
Finally, Here we came the goal we set ourselves, that is, to add the current time to a video. Video surveillance cameras always have an indication of the current time while shooting.
So starting from the previous example will do some additions so you can bring in your movie a text with the date and time.
from picamera import PiCamera
import datetime as dt
import time

camera = PiCamera()
camera.resolution = (1280, 720)

camera.start_preview()
camera.annotate_text = dt.datetime.now().strftime('%Y-%m-%d %H:%M:%S')
camera.start_recording('video.h264')

start = dt.datetime.now()
while (dt.datetime.now() - start).seconds < 30:
    camera.annotate_text = dt.datetime.now().strftime('%Y-%m-%d %H:%M:%S')
    camera.wait_recording(0.2)
camera.stop_recording() camera.stop_preview()
First, to manage the times and dates you need to import the datetime module. Then, in annotate_text, assigns the current time string with the format% Y-% m-% d% H:% M:% S, which shows both the date and the time.
Then to change the time during shooting, gradually that the video is captured, the annotate_text value is updated in a while loop. This allows to always report the current time.

Conclusions
In this article you’ve seen how to adjust some of the webcam settings and how you can add text during shooting. Did you see how you can add dynamic text during a movie with a simple program in Python. In future articles you will see more complex cases.[:]