Introduction
The WiFi101 library allows you to programmatically use WiFi technology on Arduino systems powered by Arduino WiFi Shield 101 or directly using the Arduino MKR1000 board that has integrated WiFi. Needless to say, this library is one of the key building blocks for the development and use of Arduino as a IoT solution.
In this article you will see how the WiFi101 library is structured, its commands and functions, through the creation of simple programs. These practical examples will highlight the basic concepts of the library in a gradual manner thus allowing you to become familiar with this library.
Using WiFi on Arduino
At the current time, when the Internetet of Things (IoT) is increasingly becoming a pressing reality to which it is not possible to abstain, it seems impossible to continue working with the Arduino boards without taking advantage of WiFi technology and all that entails.
The ability to connect to WiFi networks not only allows the exchange of data between the various devices that make up our project without using wires or cables, but makes our project more appropriate and in line with current prerogatives. So in order not to fail in this regard modules have been developed that allow the easy integration of WiFi technology on all Arduino systems.

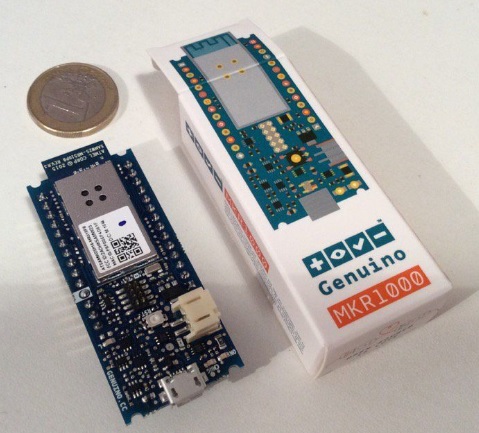
For systems already present and established on the market, such as Arduino UNO and Arduino MEGA, a special shield has been developed that integrates perfectly with them: Arduino WiFi Shield 101. While the latest Arduino boards, such as Arduino MKR1000 and Arduino YUN they are already produced with the Integrated WiFi system.
But for you to use WiFi technology, not only the hardware part is enough, but also a series of tools that allow us to exploit it programmatically within our sketches in the Arduino IDE development environment.
In this regard, the WiFi101 library has been released, allowing you to fully exploit and manage WiFi through a series of commands and functions to be included in our programs.
Arduino Shield WiFi101
We said that the Arduino boards can use the potential of Wifi networks, using the Arduino WiFi shield 101. This shield is mounted directly above the Arduino boards using the SPI bus.
On the Arduino UNO boards and the like, the pins used are the digital PINs 11,12,13 while on Arduino Mega the PIN 50,51,52. While as SSI we have on Arduino Uno and similar PIN 10 while on the Mega the PIN 53 will have to be kept as output otherwise there will be problems of malfunctioning of the system.
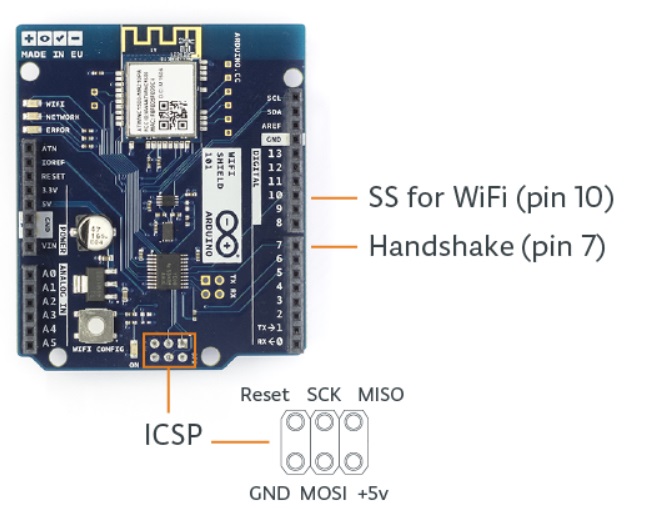
In addition to the PINs that have just been indicated, other PINs cover other necessary features and therefore can not be used for other purposes.
- PIN 7 is used as a pin handshake between the Arduino board and the WiFi shield
- PIN 6 is connected to the button integrated on the board
- PIN 5 corresponds to the RESET line of the WINC1500 module integrated on the module.
WiFi101 and the network configuration
Before starting to see the library in detail, it is necessary to make a small clarification on the configurations of the Wifi network. In fact, there are different types of WiFi networks. Their type varies depending on the cryptography system used. As for the WiFi101 library and therefore all the Arduino systems in general, all WiFi connections are available that make use of WEP and WPA2 Personal encryption systems. You will not be able to make connections that use WPA2 Enterprise as a cryptographic system.
Regardless of the type of WiFi used, the purpose of the WiFi101 library is to make any type of connection as simple as possible. However, a minimum configuration is required in which both the SSID and the password will be specified. If the connection is WEP then as password will need to pass a hexadecimal string that is equivalent to the key. A WEP network can have up to 4 different keys, each of them assigned to a corresponding Key Index value. So in this case it will be necessary to specify in the configuration not only the SSID and the key (password) but also the key number.
The WiFi101 library
The WiFi101 library is very similar to the Ethernet and WiFi libraries, which are also present as standard libraries in the Arduino IDE development environments. In fact, many functions that perform the same operations on these last two libraries have retained the name, in order to make sketch development with Arduino easier and more coherent.
Requirements
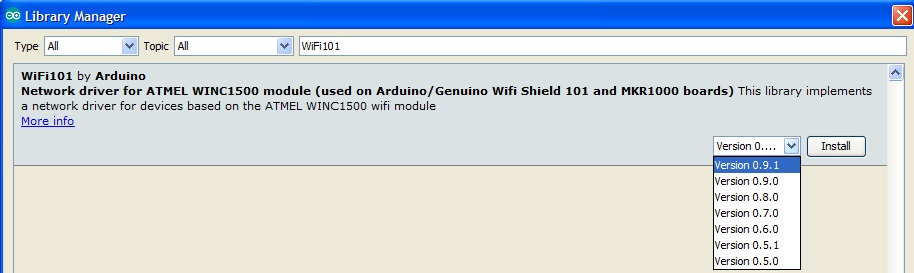
The WiFi101 library requires that the firmware installed on the cards or shield is in line with it. When updating the library to a newer version, the corresponding firmware must also be updated. To do this, it is highly recommended that you use the Library Manager in the Arduino IDE to monitor both versions and update them if necessary.
The classes of the WiFi101 library
The WiFi101 library has the following classes:
- WiFi – initializes the Ethernet library and network settings
- IPAddress – provides information about the network configuration
- Server – creates WiFi servers that send and manage data packets from clients
- Client – connects to a Wifi server to send data packets
- UPD – manages UPD messages to send and receive
The WiFi class
The WiFi class is the main class of the library and plays the basic role. In fact every object of the WiFi class corresponds to a WiFi connection.
The library will then provide a series of functions that allow us to manage a connection. For example the functions
- begin()
- end()
they correspond to the opening and closing of a WiFi connection. The begin() function initializes the WiFi class and can have different arguments depending on the type of WiFi network to which we want to connect.
WiFi.begin();
WiFi.begin(ssid);
WiFi.begin(ssid, pass);
WiFi.begin(ssid, keyIndex, key);
To better understand this function, let’s see how it fits into an Arduino sketch with a small example.
#include <WiFi101.h>

char ssid[] = "yourNetwork";
char pass[] = "secretPassword";

void setup()
{
 WiFi.begin(ssid, pass);
}

void loop () {}
In this case you want to connect our Arduino to a WiFi network with WPA encryption and then you need to specify an SSID network (the network name) and password. Then you will use the begin() function of the WiFi class inside setup(), because it is used only once: once the connection is opened (initialization) you will pass to its use (inside loop()).
Another interesting feature of the WiFi class is config().
This function allows us to specify the configuration to be used by defining a static IP address, and the DNS, gateway and subnet addresses of the WiFi module (both shield and integrated) on Arduino. Generally you should use it before calling the begin() function.
WiFi.config(ip);
WiFi.config(ip, dns);
WiFi.config(ip, dns, gateway);
WiFi.config(ip, dns, gateway, subnet);
Now you can see the use of this function with an example sketch. First you must define a static IP address and we can do this by instantiating an IPAddress object, which is still part of the WiFi library.
#include <WiFi101.h>

// the Arduino's static IP address
IPAddress ip(192, 168, 1, 177);
char ssid[] = "yourNetwork";
char pass[] = "secretPassword";
int status = WL_IDLE_STATUS;

void setup()
{
  Serial.begin(9600);
  WiFi.config(ip);

  // attempt to connect to Wifi network:
  while ( status != WL_CONNECTED) {
    Serial.print("Attempting to connect to SSID: ");
    Serial.println(ssid);
    status = WiFi.begin(ssid, pass);

    // wait 10 seconds for connection:
    delay(10000);
  }

// print your WiFi shield's IP address:
 IPAddress ip = WiFi.localIP();
 Serial.print("IP Address: ");
 Serial.println(IpAddress2String(ip));
}

void loop () {}

String IpAddress2String(const IPAddress& ipAddress)
{
    return String(ipAddress[0]) + String(".") +\
      String(ipAddress[1]) + String(".") +\
      String(ipAddress[2]) + String(".") +\
      String(ipAddress[3]) ;
}
In this example, after making the connection (if all went well), the static IP address of the Arduino WiFi module will be displayed on the terminal. This information is obtained through the function localIP() which returns a value of the IPAddress class. To display it in a classical way, ie type “192.168.1.77” it is necessary to add an IpAddress2String() function not present in the library. The implementation code of this function is at the end of the sketch.
There is also a very useful set of functions, especially when you want to scan the available WiFi networks.
- scanNetworks()
- SSID()
- RSSI()
- encryptionType()
The scanNetworks() function scans the available WiFi networks and returns the number. So we realize that 7 networks have been detected, one of these numbers will be assigned to each detected network. The SSID(), RSSI(), and encryptionType() functions, providing this number as an argument, will provide the network name, signal strength, and cryptography type, respectively.
There is no better way to learn these functions than to use them in an example. Here is a sketch that uses all of them.
#include <WiFi101.h>

char ssid[] = "your_network";
char pass[] = "your_password";
int status = WL_IDLE_STATUS;
byte mac[6];

void setup()
{
 Serial.begin(9600);

 status = WiFi.begin(ssid, pass);

 if ( status != WL_CONNECTED) {
    Serial.println("Couldn't get a wifi connection");
    while(true);
  }
  // if you are connected, print your MAC address:
  else {

  Serial.println("** Scan Networks **");
  byte numSsid = WiFi.scanNetworks();

  // print the list of networks seen
  Serial.print("number of available networks:");
  Serial.println(numSsid);
  // print the network number and name for each network found:
  for (int thisNet = 0; thisNet<numSsid; thisNet++) {
    Serial.print(thisNet+1);
    Serial.print(") ");
    Serial.print(WiFi.SSID(thisNet));
    Serial.print("\tSignal: ");
    Serial.print(WiFi.RSSI(thisNet));
    Serial.print(" dBm");
    Serial.print("\tEncryption: ");
    Serial.println(WiFi.encryptionType(thisNet));
  }

  }
}
Other features that can be useful:
- ping()
- status()
- macAddress()
- BSSID()
The ping() function allows you to check the presence on the network of a device with a specific IP address.
The status() function checks and returns the current state of the WiFi connection. This function is used as it is very useful within the conditions during programming. The possible states are as follows
- WL_CONNECTED: assigned when connected to a WiFi network;
- WL_AP_CONNECTED : assigned when a device is connected in Access Point mode;
- WL_AP_LISTENING : assigned when the listening for connections in Access Point mode;
- WL_NO_SHIELD: assigned when no WiFi shield is present;
- WL_IDLE_STATUS: it is a temporary status assigned when WiFi.begin() is called and remains active until the number of attempts expires (resulting in WL_CONNECT_FAILED) or a connection is established (resulting in WL_CONNECTED);
- WL_NO_SSID_AVAIL: assigned when no SSID are available;
- WL_SCAN_COMPLETED: assigned when the scan networks is completed;
- WL_CONNECT_FAILED: assigned when the connection fails for all the attempts;
- WL_CONNECTION_LOST: assigned when the connection is lost;
- WL_DISCONNECTED: assigned when disconnected from a network;
Finally, the macAddress() function returns the Mac Address value of the WiFi module on the Arduino.
WiFi.macAddress(mac);
as an argument it accepts an array of 6 bytes that is enhanced by the function.
The BSSID() function returns the mac address of the router to which you are connected.
There is online a very interesting sketch that includes all the previous functions and is very representative of the use of this library. Here is the code.
/*
  This example connects to a encrypted WiFi network (WPA/WPA2).
  Then it prints the  MAC address of the WiFi shield,
  the IP address obtained, and other network details.
  Then it continuously pings given host specified by IP Address or name.
  Circuit:
   WiFi shield attached / MKR1000

  created 13 July 2010
  by dlf (Metodo2 srl)
  modified 09 June 2016
  by Petar Georgiev
*/
#include <WiFi101.h>

char ssid[] = "your_network";
char pass[] = "your_password";
int status = WL_IDLE_STATUS;

String hostName = "www.google.com";
int pingResult;

void setup() {
  // Initialize serial and wait for port to open:
  Serial.begin(9600);
  while (!Serial) {
    ; // wait for serial port to connect. Needed for native USB port only
  }

  // check for the presence of the shield:
  if (WiFi.status() == WL_NO_SHIELD) {
    Serial.println("WiFi shield not present");
    // don't continue:
    while (true);
  }

  // attempt to connect to WiFi network:
  while ( status != WL_CONNECTED) {
    Serial.print("Attempting to connect to WPA SSID: ");
    Serial.println(ssid);
    // Connect to WPA/WPA2 network:
    status = WiFi.begin(ssid, pass);

    // wait 5 seconds for connection:
    delay(5000);
  }

  // you're connected now, so print out the data:
  Serial.println("You're connected to the network");
  printCurrentNet();
  printWiFiData();
}

void loop() {
  Serial.print("Pinging ");
  Serial.print(hostName);
  Serial.print(": ");

  pingResult = WiFi.ping(hostName);

  if (pingResult >= 0) {
    Serial.print("SUCCESS! RTT = ");
    Serial.print(pingResult);
    Serial.println(" ms");
  } else {
    Serial.print("FAILED! Error code: ");
    Serial.println(pingResult);
  }

  delay(5000);
}

void printWiFiData() {
  // print your WiFi shield's IP address:
  IPAddress ip = WiFi.localIP();
  Serial.print("IP address : ");
  Serial.println(ip);

  Serial.print("Subnet mask: ");
  Serial.println((IPAddress)WiFi.subnetMask());

  Serial.print("Gateway IP : ");
  Serial.println((IPAddress)WiFi.gatewayIP());

  // print your MAC address:
  byte mac[6];
  WiFi.macAddress(mac);
  Serial.print("MAC address: ");
  Serial.print(mac[5], HEX);
  Serial.print(":");
  Serial.print(mac[4], HEX);
  Serial.print(":");
  Serial.print(mac[3], HEX);
  Serial.print(":");
  Serial.print(mac[2], HEX);
  Serial.print(":");
  Serial.print(mac[1], HEX);
  Serial.print(":");
  Serial.println(mac[0], HEX);
  Serial.println();
}

void printCurrentNet() {
  // print the SSID of the network you're attached to:
  Serial.print("SSID: ");
  Serial.println(WiFi.SSID());

  // print the MAC address of the router you're attached to:
  byte bssid[6];
  WiFi.BSSID(bssid);
  Serial.print("BSSID: ");
  Serial.print(bssid[5], HEX);
  Serial.print(":");
  Serial.print(bssid[4], HEX);
  Serial.print(":");
  Serial.print(bssid[3], HEX);
  Serial.print(":");
  Serial.print(bssid[2], HEX);
  Serial.print(":");
  Serial.print(bssid[1], HEX);
  Serial.print(":");
  Serial.println(bssid[0], HEX);

  // print the received signal strength:
  long rssi = WiFi.RSSI();
  Serial.print("signal strength (RSSI): ");
  Serial.println(rssi);

  // print the encryption type:
  byte encryption = WiFi.encryptionType();
  Serial.print("Encryption Type: ");
  Serial.println(encryption, HEX);
  Serial.println();
}
The IPAddress class
The IPAddress class, which you have already used in the previous examples, is strictly connected to the previous class and its functions have the sole purpose of returning the IP addresses set in the current configuration:
- localIP()
- subnetMask()
- gatewayIP()
The Server class
This class allows you to manage the Arduino module as a WiFi server. Then it will provide a series of functions suitable for the purpose of sending and receiving data from the various connected clients.
Let’s see a brief example of starting a WiFi server listening on port 80.
#include <SPI.h>
#include <WiFi101.h>

char ssid[] = "myNetwork";          //  your network SSID (name)
char pass[] = "myPassword";   // your network password
int status = WL_IDLE_STATUS;

WiFiServer server(80);

void setup() {
  // initialize serial:
  Serial.begin(9600);
  Serial.println("Attempting to connect to WPA network...");
  Serial.print("SSID: ");
  Serial.println(ssid);

  status = WiFi.begin(ssid, pass);
  if ( status != WL_CONNECTED) {
    Serial.println("Couldn't get a wifi connection");
    while(true);
  }
  else {
    server.begin();
    Serial.print("Connected to wifi. My address:");
    IPAddress myAddress = WiFi.localIP();
    Serial.println(myAddress);

  }
}
void loop() {}
As you can see from the example after starting the WiFi connection, the WiFi server is activated using the begin() function.
For writing and sending data, the class provides these functions:
- write()
- print()
- println()
Extend the previous example so that messages received from a client are read back to all listening clients.
#include <WiFi101.h>

char ssid[] = "yourNetwork";
char pass[] = "yourPassword";
int status = WL_IDLE_STATUS;

WiFiServer server(80);

void setup() {
  // initialize serial:
  Serial.begin(9600);
  Serial.println("Attempting to connect to WPA network...");
  Serial.print("SSID: ");
  Serial.println(ssid);

  status = WiFi.begin(ssid, pass);
  if ( status != WL_CONNECTED) {
    Serial.println("Couldn't get a wifi connection");
    while(true);
  }
  else {
    server.begin();
  }
}

void loop() {
  // listen for incoming clients
  WiFiClient client = server.available();
  if (client == true) {
    // read bytes from the incoming client and write them back
    // to any clients connected to the server:
    server.write(client.read());
  }
}
The Client class
In the same way as the Server class, there is a Client class that manages the sending and receiving of data packets.
#include <WiFi101.h>

char ssid[] = "myNetwork";
char pass[] = "myPassword";
int status = WL_IDLE_STATUS;
IPAddress ipserver(216,58,205,142); // Google

// Initialize the client library
WiFiClient client;

void setup() {
  Serial.begin(9600);
  Serial.println("Attempting to connect to WPA network...");
  Serial.print("SSID: ");
  Serial.println(ssid);

  status = WiFi.begin(ssid, pass);
  if ( status != WL_CONNECTED) {
    Serial.println("Couldn't get a wifi connection");
    // don't do anything else:
    while(true);
  }
  else {
    Serial.println("Connected to wifi");
    Serial.println("\nStarting connection...");
    // if you get a connection, report back via serial:
    if (client.connect(server, 80)) {
      Serial.println("connected");
      // Make a HTTP request:
      client.println("GET /search?q=arduino HTTP/1.0");
      client.println();
    }
  }
}

void loop() { }
Here, too, the functions of reading and writing data are carried out by a set of functions:
- write()
- println()
- print()
- read()
- flush()
The flush() function deletes all data that has been received by the client but has not yet been read.
The UDP class
As for the sending and receiving of data, these can be sent via the UDP (User Datagram Protocol) and unlike TCP packets, they work in connectionless mode. That is, the packets are sent without checking their correct reception on the other side (there is no re-sending in case of an error) and there is no package ordering system. On the other hand, this protocol is very fast.
The UDP class takes care of the management of UDP messages to be sent or received. The beginPacket () function initializes a connection for sending a UDP packet.
WiFiUDP.beginPacket(hostName, port);
WiFiUDP.beginPacket(hostIp, port);
while the endPacket() function terminates the UPD package and sends it.
The class provides a series of functions for writing, reading and managing the data to be sent.
- write()
- peek()
- read()
- flush()
Let’s see an example in which a string is sent and received via UDP messages
/*
  WiFi UDP Send and Receive String

 This sketch wait an UDP packet on localPort using a WiFi shield.
 When a packet is received an Acknowledge packet is sent to the client on port remotePort

 Circuit:
 * WiFi shield attached

 created 30 December 2012
 by dlf (Metodo2 srl)

 */
#include <WiFi101.h>
#include <WiFiUdp.h>

int status = WL_IDLE_STATUS;
char ssid[] = "myNetwork";
char pass[] = "myPassword";

unsigned int localPort = 2390;      // local port to listen on

char packetBuffer[255]; //buffer to hold incoming packet
char  ReplyBuffer[] = "acknowledged";       // a string to send back

WiFiUDP Udp;

void setup() {
  //Initialize serial and wait for port to open:
  Serial.begin(9600);
  while (!Serial) {
    ; // wait for serial port to connect. Needed for native USB port only
  }

  // check for the presence of the shield:
  if (WiFi.status() == WL_NO_SHIELD) {
    Serial.println("WiFi shield not present");
    // don't continue:
    while (true);
  }

  // attempt to connect to WiFi network:
  while ( status != WL_CONNECTED) {
    Serial.print("Attempting to connect to SSID: ");
    Serial.println(ssid);
    // Connect to WPA/WPA2 network. Change this line if using open or WEP network:
    status = WiFi.begin(ssid, pass);

    // wait 10 seconds for connection:
    delay(10000);
  }
  Serial.println("Connected to wifi");
  printWiFiStatus();

  Serial.println("\nStarting connection to server...");
  // if you get a connection, report back via serial:
  Udp.begin(localPort);
}

void loop() {

  // if there's data available, read a packet
  int packetSize = Udp.parsePacket();
  if (packetSize)
  {
    Serial.print("Received packet of size ");
    Serial.println(packetSize);
    Serial.print("From ");
    IPAddress remoteIp = Udp.remoteIP();
    Serial.print(remoteIp);
    Serial.print(", port ");
    Serial.println(Udp.remotePort());

    // read the packet into packetBufffer
    int len = Udp.read(packetBuffer, 255);
    if (len > 0) packetBuffer[len] = 0;
    Serial.println("Contents:");
    Serial.println(packetBuffer);

    // send a reply, to the IP address and port that sent us the packet we received
    Udp.beginPacket(Udp.remoteIP(), Udp.remotePort());
    Udp.write(ReplyBuffer);
    Udp.endPacket();
  }
}


void printWiFiStatus() {
  // print the SSID of the network you're attached to:
  Serial.print("SSID: ");
  Serial.println(WiFi.SSID());

  // print your WiFi shield's IP address:
  IPAddress ip = WiFi.localIP();
  Serial.print("IP Address: ");
  Serial.println(ip);

  // print the received signal strength:
  long rssi = WiFi.RSSI();
  Serial.print("signal strength (RSSI):");
  Serial.print(rssi);
  Serial.println(" dBm");
}
Connecting to a WEP network
A type of WiFi network that uses a different cryptography system is the WEP WiFI network. This type of network requires a hexadecimal key of variable length (from 40 to 128 bits) associated with a key number.
The example sketch will show how to connect to a WEP network called “yourNetword” that for key “ABBADEAF01” and as key index “0”.
#include <WiFi101.h>
char ssid[] = "yourNetwork";     //  your network SSID (name)
char key[] = "ABBADEAF01";    // your network key
int keyIndex = 0;            //your network key Index number
int status = WL_IDLE_STATUS;     // the Wifi radio's status

void setup() {
// initialize serial:
Serial.begin(9600);

// attempt to connect using WEP encryption:
Serial.println("Attempting to connect to WEP network...");
status = WiFi.begin(ssid, keyIndex, key);

// if you're not connected, stop here:
if ( status != WL_CONNECTED) {
Serial.println("Couldn't get a wifi connection");
while(true);
}
// if you are connected, print out info about the connection:
else {
Serial.println("Connected to network");
}
}

void loop() {
// do nothing
}
Conclusions
In this article you have seen how the WiFi101 library allows you to take full advantage of the capabilities of Arduino systems to interface to a WiFi network. You have thoroughly analyzed the library by looking in detail at the classes it is composed of and their relative functions, along with some small examples. Finally, some sketches gave you a general overview of how this library can be used and how Arduino can be integrated into the development of IoT projects.[:]