
In recent times there has been little talk of whether or not it is necessary to mount heatsinks on the latest Raspberry version, the Pi 4. This board, by mounting a higher performance processor, should produce more heat. If for the Raspberry Pi 3 the addition of a fan might have seemed like an option only for enthusiasts, it would seem that for the Raspberry Pi 4 the choice to integrate a heat dissipation system is quite mandatory. The options are varied, as are the prices (however very low) which range from simple heatsinks to be glued directly onto the chips, up to real fan systems and heatsink panels to be completely integrated onto the board.
[wpda_org_chart tree_id=36 theme_id=50]
Broadcom BCM2711 processor overheating
The Raspberry Pi 4 is equipped with a Broadcom BCM2711 processor. This is a 64-bit quad-core Cortex-A72 processor with variable clock frequency, which can be configured to operate at different speeds, from 600 MHz to 1.5 GHz or more, depending on performance needs and conditions cooling. The presence of a quad-core processor makes the Raspberry Pi 4 significantly more powerful than its predecessors, providing greater processing capacity for a variety of applications.

The Raspberry Pi 4 can generate heat, especially when used in more computationally intensive applications or in high-temperature environments. Heat generation can affect device performance and, in some cases, require additional heat dissipation measures to keep processor temperatures within safe limits.
Here are some considerations:
- Heat Sinks and Fans: To address the issue of overheating, many users add heat sinks or fans to the Raspberry Pi 4. These accessories help keep the temperature at acceptable levels.
- Houses with Ventilation: Using cases designed for heat dissipation can be helpful. Some cases include built-in fans or designs that facilitate airflow, helping to keep the Raspberry Pi cooler.
- Limit Clock Frequency: You can also consider limiting the processor clock frequency if maximum performance is not necessary for your specific application. This can reduce heat generation.
- Cool Environments: Placing the Raspberry Pi in a cooler environment can help maintain a lower temperature. Avoid placing it in places with little ventilation or near other heat sources.
- Temperature Monitoring: You can monitor the temperature of the Raspberry Pi using tools like vcgencmd measure_temp from terminal. This will allow you to evaluate whether the device is reaching critical temperatures.
Remember that the level of heat dissipation needed depends on the specific use of the Raspberry Pi. If you are designing a system that requires consistent performance
Monitoring the CPU temperature and speed
Given the subject matter, it will be very useful experience firsthand all this. For example you may be of interest to have a script that monitor the temperature and the speed of the CPU during the working operations. I found on the net this interesting script.Write the following script and save it as checkCPU.sh.
#!/bin/bash
CPU=$(</sys/class/thermal/thermal_zone0/temp)
while [ $CPU -gt 30000 ]; do
    CPU=$(</sys/class/thermal/thermal_zone0/temp)
    MHZ=$(</sys/devices/system/cpu/cpu0/cpufreq/cpuinfo_cur_freq)
    echo "$(date)"
    echo "CPU: $((CPU/1000))'C"
    echo "GPU: $(/opt/vc/bin/vcgencmd measure_temp)"
    echo "MHZ: $((MHZ/1000))"
    sleep 10
done
change the permissions
$ chmod ugo+x checkCPU.sh
and then executeit
$ sudo ./checkCPU.sh
The script will show the situation of temperature and speed every 10 seconds.
Mounting of heat sinks
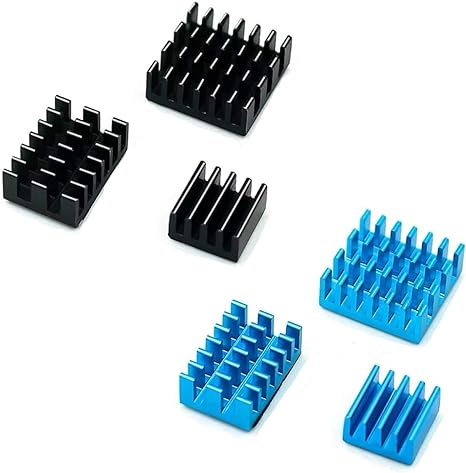
There are several heat sinks on the market and their price is truly negligible. Including the aluminum ones which cost practically 4 euros and are also adaptable to the Raspberry Pi 2 and 3. One of the most popular and economical models are the adhesive aluminum heat sinks from GeeekPi to be applied directly to the chips present on the board.
Recommended product
Their bottom is practically adhesive with a layer of thermally conductive plastic to be glued directly over the processors present on the Raspberry Pi 4, 3 and 2.
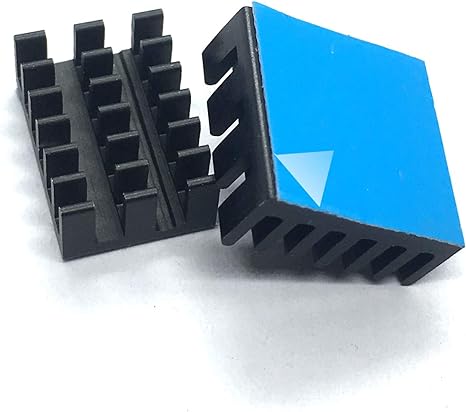
This is how the heatsinks should be glued onto the board.
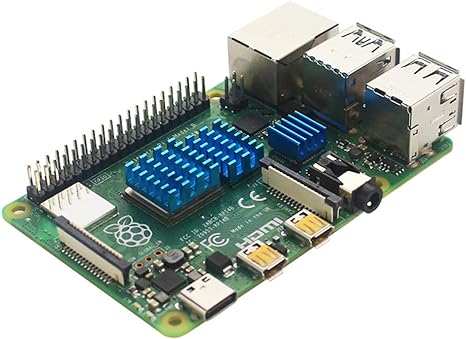
While there is another model, produced by Geekworm, in which the heat sinks are made of copper instead of aluminium. The price is slightly higher (around 8 dollars), as are the heat transmission capabilities.

Recommended product
Complete Starter Kits (without too many worries)
Very interesting are the complete kits that incorporate both heatsinks and a fan and some of these are also equipped with a transparent box built specifically to fix the fan. Also from GeeekPi we have a heat sink structure common to all chips equipped with a built-in fan, the price of which always remains low at 11 dollars. This model is easy to embed on a Raspberry Pi board and also features PWM fan speed control.

GeeekPi also offers an even more powerful system for cooling the Raspberry Pi chips. For lovers of great performance and for those who like to bring Rasbperry to the maximum performance levels there is a product complete with heat sink with a powerful fan perfectly integrated with truly remarkable performance at a slightly higher cost (17 euros).
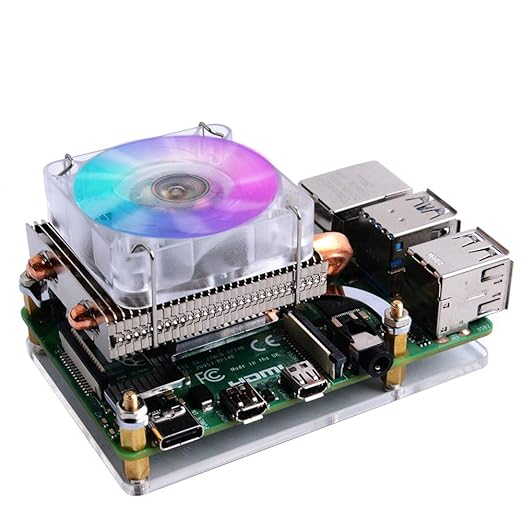
Suggested product:
Conclusions
At the end of all it can be deduced from the facts that if you have to work intensely with the processor on Raspberry and/or the card is enclosed inside a box or small case, it is certainly necessary to add a cooling system by adding a heat sink on the CPU and a fan.