
What are EEPROMs
EEPROMs, which are the acronym for Electrically Erasable Programmable Read-Only Memory, are special microchips used to store data even after the device on which they are mounted has been turned off. The next time it is turned on, the device will then have data available to be loaded. That is, they are memory devices that, unlike RAM, are able to keep information inside them even after the power supply has been turned off.
Many controllers, as well as those used for Arduino, such as the ATMega328, have EEPROM chips inside that allow you to keep a set of useful data even after the device is turned off. So we often talk about EEPROM memory, similarly to what we refer to RAM memory.
So every Arduino board is equipped with this kind of memory, even if depending on the model their size will be different. In particular, the size will depend on the type of processor used by the board.
- 512 bytes on ATmega168 and ATmega8
- 1024 bytes on ATmega328P
- 4096 bytes on ATmega1280 and ATmega2560.
It is also possible to expand the size of the EEPROM memory available by using special Microchips to be connected to the board and which use the I²C protocol to communicate (see Microchip 24LC1025).

Small curiosity about EEPROM: in reality there is a limit of times in which the memory cells present inside it can be rewritten. But nothing to worry, as it involves around a million rewrites. However, it is also important to take this into account in particular applications. The same thing is the duration of time in which a cell is able to keep the data in the absence of current. Well the manufacturers affirm a time limit of 10 years, but this period can vary depending on the state of conservation and the temperature in which the microchip is stored.
What are the EEPROMs on Arduino for?
Arduino boards, like all processors up to the computers themselves, need memory in order to store information. To do this, Arduino has three different types of memory available:
- FLASH memory
- RAM memory
- EEPROM memory
The FLASH memory is the one used by Arduino to store the sketch code once compiled. Once the code is uploaded, it will remain unchanged until the next upload (new compiled code). When the Arduino board is powered on, it will read the code to execute here. FLASH memory such as EEPROM memory also retains information after the card is turned off.
The RAM memory is used to contain the values of the variables defined in the sketch code and which are necessary for the correct execution of the program. These will vary in content throughout the duration of the execution, the variables can be created and destroyed and once the device is turned off, the entire memory with the data inside will be deleted.
The EEPROM memory is used to store data and parameters that must be used even after the device is turned off. It therefore has a function very similar to that of a hard disk for a computer, where data files are stored to be able to preserve them over time.
We therefore understand that the EEPROM has a rather particular function. An example of how it could be used on Arduino is to save a particular configuration or set of recovery data, in order to be able to restart the next time the board is reactivated from a particular point (recovery of the previous session).
So an important aspect of EEPROMs to take into consideration is that of not using them for reading and writing common variables, which instead must be done on RAM. This is for a variety of reasons… not just the possibility of not being able to rewrite the cells over and over again, but above all performance talk. In fact, the EEPROM memory has been designed for other purposes than RAM, and therefore the access and write times are much slower than the latter.
The EEPROM library
To work efficiently with the EEPROM memory within the sketches, the Arduino editor, Arduino IDE, provides us with a library that provides us with many functions that facilitate the task of reading and writing on it: the EEPROM library.
So first of all, if we intend to use this library, we must first include it at the beginning of the sketch.
#include <EEPROM.h>
One of the aspects that must be taken into account before starting to program the sketch, is that when dealing with an EEPROM memory you have to work with memory addresses.
Each time a value is written or accessed in the EEPROM, the memory address must be specified. Considering that a normal Arduino UNO has 512 bytes of EEPROM memory we will have a set of addresses that will range from 0 to 511.
Therefore to write and read data on the EEPROM you will use the read and write functions made available to the library, specifying these values in the parameters as well.
EEPROM.write(address, value)
EEPROM.read(address)
As for the writable values, these must be those that can be contained in a byte of memory. We will see in detail in the following examples.
Write and Read values on the EEPROM
So to see how writing and reading on the Arduino EEPROM works, let’s implement a useful example.
We develop a sketch in which from the Serial Monitor, we will enter, via the keyboard, some integers from 1 to 9 which will be added gradually. This is a great way to simulate serial data acquisition while running a program. The sum of the entered values will be contained in the value variable.
At a certain point this value will be stored for future use on the EEPROM, for example by entering the command ‘w’ (which stands for write) via the serial link. In these cases it is important to understand the range of values that this value can take. If by chance it is an integer from 0 to 255 we will be able to use only one byte, while if by chance it is between 0 and 65,535 then we will have to use two bytes.
In the first case (the one with only 1 byte), it will be simple, by specifying the value value directly within the EEPROM.write (address, value) command. The same is true for the memory address, which will correspond to a single 1-byte cell. But in the case of 2 or more bytes?
Now in these cases it is necessary to manage several memory cells at the same time. A good strategy will be to use adjacent memory addresses. In our simple example, using integer values that take up 2 bytes, we will consider the first two cells with addresses 0 and 1.
214/5000We therefore define two integer constants COUNT_ADDR1 and COUNT_ADDR2 to define the two memory addresses of the EEPROM dedicated to containing the value value. We will also define the variable value by initializing it to 0.
include <EEPROM.h>

const int COUNT_ADDR1 = 0;
const int COUNT_ADDR2 = 1;
int value = 0;
Then in the setup() function of the sketch, we will first define a serial communication at 9600 baud. We perform the reading of the two values contained in the first two cells that we will insert in the variables hiByte, and lwByte. To recompose the two parts into the original integer value, we will use the word() function. With a text string then we define the serial printing of the value read, prevCount.
void setup() {
   Serial.begin(9600);
   byte hiByte = EEPROM.read(COUNT_ADDR1);
   byte lwByte = EEPROM.read(COUNT_ADDR2);
   int prevCount = word(hiByte, lwByte);
   Serial.print("In the previous session, your Arduino counted ");
   Serial.print(prevCount);
   Serial.println(" events");
}
The displayed value is exactly what was stored the previous time we used Arduino, that is, the last we recorded before removing the power to the board.
Now in the loop() function, we will implement the interactive program that will read the integers entered by the user via the serial line and will wait for the ‘r’ and ‘w’ commands to read and write the data recorded on the EEPROM card.
We first write in an if nesting, the management of numeric characters between 0 and 9 which will be interpreted as numbers and added to the existing value within value, which will be printed at each update.
void loop() {
   if( Serial.available()){
      char ch = Serial.read();
      if ( ch >= '0' && ch <= '9'){
         value = value + (ch - '0');
         Serial.print("value =");
         Serial.println(value);
      }
If the character entered via the serial link will correspond to ‘w’, then the sketch will write the value on the EEPROM. Then we divide the interior into the two bytes highByte and lowByte and then the two values will be written via EEPROM.write(). We reset the value of – making it restart from 0.
if ( ch == 'w' ){byte hi = highByte(value);byte lw = lowByte(value);EEPROM.write(COUNT_ADDR1, hi);EEPROM.write(COUNT_ADDR2,lw);Serial.println("value written on EEPROM");value = 0;}
If, on the other hand, the character entered is ‘r’ (read) then a reading will be made of the value contained in the first two cells of the EEPROM. The two byte values of the single cells are then read and then the whole value is recomposed with the word () function.
if ( ch == 'r'){byte hi = EEPROM.read(COUNT_ADDR1);byte lw = EEPROM.read(COUNT_ADDR2);int v = word(hi, lw);Serial.print("value read on EEPROM: ");Serial.println(v);}}}
At this point the sketch code is complete. Let’s check and then compile the code and then run it on Arduino. We open the serial monitor and wait 1 or 2 seconds. In my case the value read on EEPROM is equal to 0.

Let’s start entering a series of numerical values using the keyboard

Once a certain value has been reached, we decide to write it on the EEPROM, write ‘w’ with the keyboard and press ENTER.
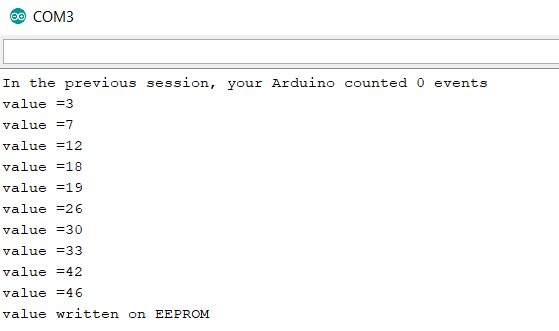
Now let’s turn off and turn on our Arduino board and then reopen the serial monitor.

As you can see, the program will print the last value written on the EEPROM, even after several weeks that you have left the Arduino off and closed in some drawer.
The EEPROM.update method
In the previous program we used EEPROM.write to write the values into the memory cells of the EEPROM. A more efficient way to do this is by using the EEPROM.update command. This differs from the previous one in that the memory cell will be written only if the content differs from the value to be written.
This avoids having to rewrite the same value on a cell, thus shortening its life span, and also performing an unnecessary operation.
So in the previous example, it would be advisable to modify the EEPROM.write function with EEPROM.update.
if ( ch == 'w' ){byte hi = highByte(value);byte lw = lowByte(value);EEPROM.update(COUNT_ADDR1, hi);EEPROM.update(COUNT_ADDR2,lw);Serial.println("value written on EEPROM");value = 0;}
EEPROM.Get and EEPROM.Put
In the previous example we saw the write and read methods, which work at the level of a single memory cell. At a higher level there are the EEPROM.get and EEPROM.put methods that allow you to work directly at the variable level, regardless of how many bytes it occupies.
Let’s rewrite the sketch of the previous example
include
const int COUNT_ADDR = 0;
int value = 0;

void setup() {
    Serial.begin(9600);
    int prevCount;
    EEPROM.get(COUNT_ADDR, prevCount);
    Serial.print("In the previous session, your Arduino counted ");
    Serial.print(prevCount);
    Serial.println(" events");
}

void loop() {
    if( Serial.available()){
       char ch = Serial.read();
       if ( ch >= '0' && ch <= '9'){
          value = value + (ch - '0');
          Serial.print("value =");
          Serial.println(value);
       }
       if ( ch == 'w' ){
          EEPROM.put(COUNT_ADDR, value);
          Serial.println("value written on EEPROM");
          value = 0;
       }
       if ( ch == 'r'){
          int v;
          EEPROM.get(COUNT_ADDR, v);
          Serial.print("value read on EEPROM: ");
          Serial.println(v);
       }
    }
}
As we can see from the code, it is no longer necessary to divide the data into bytes and manage their single writing. The EEPROM.get() and EEPROM.put() methods, depending on the type of data passed by parameter, are able to evaluate how many bytes must be managed. So only one address will need to be used.
- EEPROM.get(address, value)
- EEPROM.put(address, value)
This is why you need to pass two parameters to both methods. Also, value is passed by reference and then directly updated. There is therefore no value returned by the EEPROM.get() method.
Iterations on the EEPROM
So far we have seen an example where single cell addresses are specified to hold specific variables.
The most common operation on the EEPROM will be to move through the memory space of the EEPROM. There are several approaches.
33/5000Either the for loop can be used
   for (int index = 0 ; index < EEPROM.length() ; index++) {
        //Add one to each cell in the EEPROM
        EEPROM[ index ] += 1;
  }
that the while loop
  int index = 0;

  while (index < EEPROM.length()) {
    //Add one to each cell in the EEPROM
    EEPROM[ index ] += 1;
    index++;
  }
or even the do while loop
 int index = 0;

  do {
    //Add one to each cell in the EEPROM
    EEPROM[ index ] += 1;
    index++;
  } while (index < EEPROM.length());
As for iterative loops, the EEPROM.lenght() function is very useful. This function in fact returns an unsigned int value which contains the size of the EEPROM, that is the number of memory cells. In fact, this can differ from model to model of Arduino
A Cyclic Redundancy Check (CRC) on the EEPROM
A CRC is an easy way to check if a piece of data has been modified or corrupted. This example calculates a CRC value directly on the EEPROM values. This CRC is like a signature and any change in the calculated CRC value means a change in the stored data. In this example we will see how the EEPROM object can be used as an array.
#include <Arduino.h>
#include <EEPROM.h>

void setup() {

  //Start serial
  Serial.begin(9600);
  while (!Serial) {
    ; // wait for serial port to connect. Needed for native USB port only
  }

  //Print length of data to run CRC on.
  Serial.print("EEPROM length: ");
  Serial.println(EEPROM.length());

  //Print the result of calling eeprom_crc()
  Serial.print("CRC32 of EEPROM data: 0x");
  Serial.println(eeprom_crc(), HEX);
  Serial.print("\n\nDone!");
}

void loop() {
  /* Empty loop */
}

unsigned long eeprom_crc(void) {

  const unsigned long crc_table[16] = {
    0x00000000, 0x1db71064, 0x3b6e20c8, 0x26d930ac,
    0x76dc4190, 0x6b6b51f4, 0x4db26158, 0x5005713c,
    0xedb88320, 0xf00f9344, 0xd6d6a3e8, 0xcb61b38c,
    0x9b64c2b0, 0x86d3d2d4, 0xa00ae278, 0xbdbdf21c
  };

  unsigned long crc = ~0L;

  for (int index = 0 ; index < EEPROM.length()  ; ++index) {
    crc = crc_table[(crc ^ EEPROM[index]) & 0x0f] ^ (crc >> 4);
    crc = crc_table[(crc ^ (EEPROM[index] >> 4)) & 0x0f] ^ (crc >> 4);
    crc = ~crc;
  }
  return crc;
}